Gooey Mozzarella Biscuit Bombs Recipe: A Cheesy Delight

Gooey Mozzarella Biscuit Bombs

If you’re searching for a fun, cheesy snack that’s perfect for pizza lovers, this Gooey Mozzarella Biscuit Bombs Recipe is exactly what you need! These bite-sized treats are packed with melted mozzarella, wrapped in fluffy biscuit dough, and coated with savory Parmesan—making them irresistible for any occasion. Whether you’re hosting a party or craving a quick snack, this recipe is easy to follow and delivers big on flavor.

For more delicious Italian-inspired recipes like this one, check out our collection of Italian Recipes.

Gooey Mozzarella Biscuit Bombs Recipe

Ingredients

A flat lay image of all the ingredients needed to make gooey mozzarella biscuit bombs: biscuit dough, mozzarella cheese, melted butter, parmesan cheese, garlic powder, Italian seasoning, and marinara sauce.
Gather your ingredients to create these delicious cheese-filled bites!
  • 1 can of refrigerated biscuit dough (8 biscuits)
  • 8 small mozzarella cheese balls (or string cheese cut into 1-inch pieces)
  • 1/4 cup melted butter
  • 1/2 cup grated Parmesan cheese
  • 1 teaspoon garlic powder
  • 1 teaspoon Italian seasoning
  • 1/2 cup marinara sauce (for dipping)

Steps to Make Gooey Mozzarella Biscuit Bombs

Flattening Biscuit Dough
  1. Preheat the Oven: Start by preheating your oven to 375°F (190°C). Line a baking sheet with parchment paper or lightly grease it to prevent sticking.
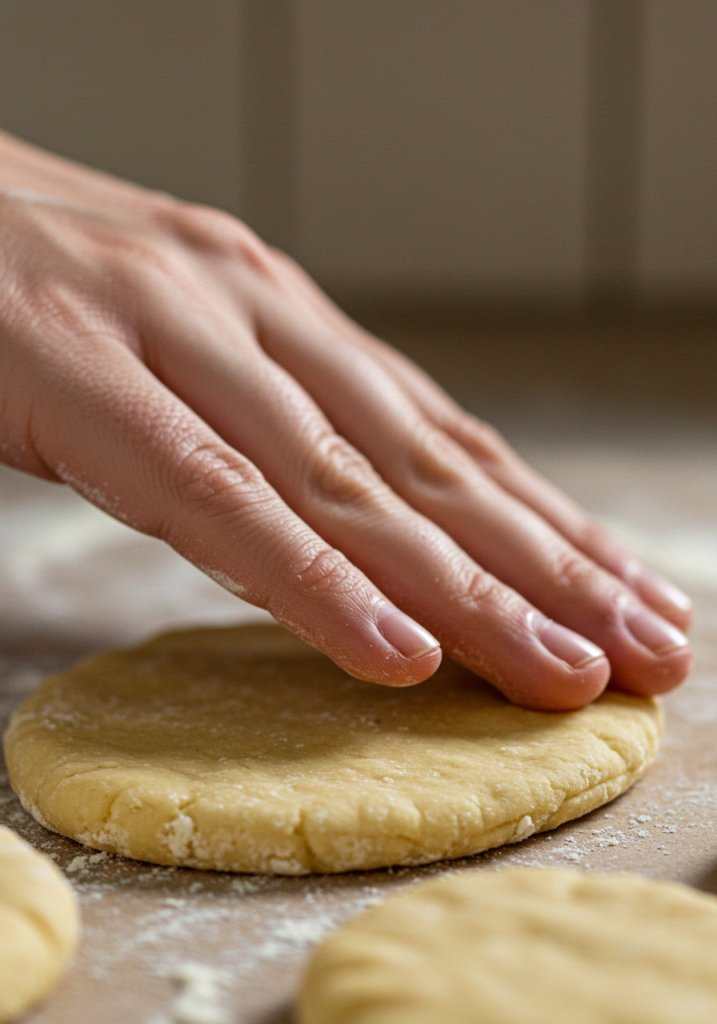
  2. Prepare the Biscuit Dough: Open the can of biscuit dough and separate the biscuits. Flatten each biscuit slightly with your hands to create a small circle.
  3. Add the Cheese: Place one mozzarella ball (or piece of string cheese) in the center of each flattened biscuit. Wrap the dough around the cheese, pinching the edges to seal it completely. Make sure there are no gaps, or the cheese will leak out during baking.
Gooey Mozzarella Biscuit Bombs
  1. Coat the Bombs: In a small bowl, mix the melted butter, garlic powder, and Italian seasoning. In another bowl, place the grated Parmesan cheese. Dip each biscuit bomb into the butter mixture, then roll it in the Parmesan cheese until fully coated.
  2. Bake: Place the coated biscuit bombs on the prepared baking sheet. Bake for 12-15 minutes, or until the biscuits are golden brown and the cheese is melted and gooey.

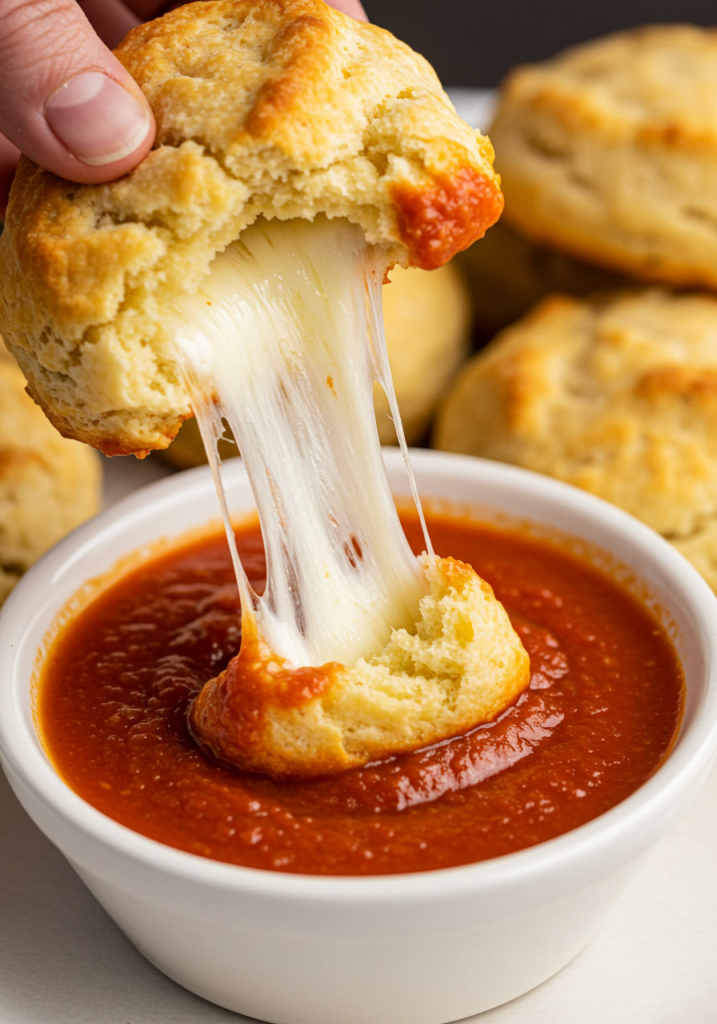
  1. Serve: Let the bombs cool for a few minutes before serving. Pair them with warm marinara sauce for dipping, and enjoy!
Gooey Mozzarella Biscuit Bombs

Why You’ll Love This Recipe

  • Easy to Make: With just a few simple ingredients, this Gooey Mozzarella Biscuit Bombs Recipe is perfect for beginners or anyone short on time.
  • Versatile: You can customize these biscuit bombs by adding your favorite pizza toppings. Try mixing in some chopped pepperoni, sautéed mushrooms, or even a sprinkle of fresh basil.
  • Crowd-Pleaser: Whether you’re hosting a party or just craving a cheesy snack, these bombs are sure to impress.

FAQs About Gooey Mozzarella Biscuit Bombs

Q: Can I use other types of cheese?
A: Absolutely! While mozzarella is classic, you can experiment with cheddar, provolone, or even a blend of cheeses for a different flavor profile.

Q: Can I make these ahead of time?
A: Yes! You can prepare the biscuit bombs up to the baking step, then cover and refrigerate them for a few hours before baking. Just add a couple of extra minutes to the baking time if they’re cold from the fridge.

Q: Are there vegetarian options?
A: This recipe is already vegetarian-friendly. For extra flavor, consider adding vegetarian pizza toppings like diced bell peppers, olives, or spinach.

Q: Can I freeze these?
A: Yes, you can freeze the unbaked biscuit bombs. Place them on a baking sheet to freeze individually, then transfer to a freezer bag. Bake from frozen, adding a few extra minutes to the cooking time.

Final Thoughts

This Gooey Mozzarella Biscuit Bombs Recipe is a delicious way to enjoy the flavors of pizza in a fun, bite-sized form. Whether you’re a fan of classic pizza toppings or love experimenting with gourmet options, this recipe is a blank canvas for your creativity. Serve them at your next gathering, and watch them disappear in minutes!

Happy cooking! 🍕

Easy Homemade Pizza Recipe

A close-up, mouthwatering view of a slice of homemade pizza with melted cheese, vibrant toppings, and a crispy crust.

There’s nothing quite like the taste of a fresh, homemade pizza. Whether you’re a beginner or a seasoned cook, this easy homemade pizza recipe will guide you through the process of making a delicious pizza from scratch. Perfect for family dinners or weekend gatherings, this recipe is quick, simple, and customizable to your taste. Let’s get started!

Ingredients for the Perfect Homemade Pizza

To make this easy homemade pizza recipe, you’ll need the following ingredients:

Ingredients for fondant potatoes including Yukon Gold potatoes, butter, olive oil, garlic, salt, pepper, chicken broth, and fresh thyme.
Gather your ingredients and get ready to create the perfect homemade pizza!
  • 2 ½ cups of all-purpose flour
  • 1 teaspoon of salt
  • 1 teaspoon of sugar
  • 1 tablespoon of olive oil
  • 1 cup of warm water
  • 1 packet of active dry yeast
  • 1 cup of pizza sauce
  • 2 cups of shredded mozzarella cheese
  • Your favorite toppings (e.g., pepperoni, mushrooms, bell peppers)

Step-by-Step Instructions

  1. Prepare the Dough:
Activating Yeast for Homemade Pizza Dough
The secret to fluffy pizza dough? Activating the yeast properly. See the froth? That’s how you know it’s working!
  1. In a large bowl, mix the warm water, sugar, and yeast. Let it sit for 5 minutes until frothy.
  2. Add the flour, salt, and olive oil. Mix until a dough forms.
  1. Knead the dough on a floured surface for 5-7 minutes until smooth.
  2. Place the dough in a greased bowl, cover it, and let it rise for 1 hour.
  3. Preheat the Oven:
    • Preheat your oven to 475°F (245°C).
  4. Shape the Dough:
Shaping Pizza Dough: Ready for Toppings
  1. Roll out the dough on a floured surface to your desired thickness.
  2. Transfer the dough to a pizza pan or baking sheet.
  3. Add Toppings:
Adding Pizza Toppings: Customize Your Creation
  1. Spread the pizza sauce evenly over the dough.
  2. Sprinkle the shredded mozzarella cheese and add your favorite toppings.
  3. Bake the Pizza:
Serving Homemade Pizza: Slice and Enjoy!
  1. Bake in the preheated oven for 12-15 minutes or until the crust is golden and the cheese is bubbly.
  2. Serve and Enjoy:
    • Let the easy homemade pizza recipe cool for a few minutes, then slice and serve!
Adding Pizza Sauce, Cheese, and Toppings: Building Flavor

Tips for the Perfect Crust

  • Use bread flour for a chewier crust.
  • Let the dough rise in a warm place for the best results.
  • Preheat your oven thoroughly to ensure a crispy crust.

Best Toppings for Your Homemade Pizza

Here are some popular topping combinations to try:

  • Classic Margherita: Fresh mozzarella, basil, and tomato slices.
  • Meat Lovers: Pepperoni, sausage, bacon, and ham.
  • Veggie Delight: Mushrooms, bell peppers, onions, and olives.

For more topping ideas, check out our guide on Best Pizza Toppings Combinations.


Why Make Pizza at Home?

Making pizza at home is not only fun but also allows you to customize your pizza exactly how you like it. Plus, it’s a great way to bond with family and friends. If you’re looking for more easy recipes, explore our collection of Italian Recipes.


Frequently Asked Questions (FAQs)

Q: Can I make the dough ahead of time?
A: Yes! You can prepare the dough and store it in the fridge for up to 24 hours.

Q: What’s the best cheese for homemade pizza?
A: Mozzarella is the most popular choice, but you can also use a blend of provolone and parmesan for extra flavor.

Q: How do I store leftover pizza?
A: Store leftovers in an airtight container in the fridge for up to 3 days. Reheat in the oven for the best results.

Valentine’s Day Pink Mudslide: The Perfect Romantic Treat

A beautifully garnished Valentine's Day Pink Mudslide cocktail surrounded by rose petals and lit candles.

Valentine’s Day is all about love, indulgence, and creating moments to cherish. What better way to celebrate than with a decadent, creamy Valentine’s Day Pink Mudslide? This cocktail blends sweetness and charm, making it the perfect addition to your romantic evening.

Why You’ll Love This Recipe

  • A visually stunning drink with a gorgeous pink hue.
  • Combines chocolate, strawberry, and creamy flavors.
  • Quick and easy to make with just a few ingredients.
  • Perfect for Valentine’s Day celebrations or date nights.

Ingredients for a Valentine’s Day Pink Mudslide

A beautifully garnished Valentine's Day Pink Mudslide cocktail surrounded by rose petals and lit candles.
A romantic pink mudslide cocktail perfect for Valentine’s Day celebrations.
  • 1 oz Baileys Irish Cream
  • 1 oz non-alcoholic vanilla extract
  • 1 oz strawberry syrup
  • 1/2 cup vanilla ice cream
  • 2 fresh strawberries (for garnish)
  • 1/4 cup whipped cream
  • 1 tsp chocolate syrup (optional for drizzling)

Step-by-Step Recipe

  • Prepare Your Glass: Chill a martini or cocktail glass in the freezer for 10 minutes. Drizzle chocolate syrup on the inside of the glass for a decorative touch.
  • Blend the Ingredients: In a blender, combine Baileys Irish Cream, non-alcoholic vanilla extract, strawberry syrup, and vanilla ice cream. Blend until smooth and creamy.
A tray of 4-ingredient peanut butter balls paired with pink mudslides.
Pair your pink mudslide with creamy peanut butter balls for the ultimate treat.
  • Pour and Garnish: Pour the blended mixture into the prepared glass. Top with whipped cream and garnish with fresh strawberries.
  • Serve: Serve immediately and enjoy your Valentine’s Day Pink Mudslide!

Pro Tips for the Best Mudslide

  • Use high-quality vanilla extract for a rich flavor.
  • For a stronger strawberry flavor, add a splash of additional strawberry syrup.
  • Swap out vanilla ice cream for strawberry ice cream for an extra pink color.

Pairings

Pair this drink with chocolate-dipped strawberries, heart-shaped cookies, or a rich chocolate dessert to complete the romantic vibe.

FAQs About Valentine’s Day Pink Mudslide

What makes the drink pink? The strawberry syrup and optional strawberry ice cream give this cocktail its vibrant pink color.

Can I make a non-alcoholic version? Yes! Substitute Baileys and vodka with strawberry milk and vanilla extract for a kid-friendly treat.

How can I make it dairy-free? Use dairy-free ice cream and whipped cream alternatives to make this drink suitable for those with lactose intolerance.

Pair this Pink Mudslide with these 4-Ingredient Peanut Butter Balls with Cream Cheese for a delightful combination. The creamy, nutty flavors of the peanut butter balls complement the smooth sweetness of the drink perfectly. Check out the recipe here.

Where can I find more pink mudslide recipes? Check out these great resources:

Indulge in the magic of Valentine’s Day with this irresistible Pink Mudslide. It’s simple, sweet, and sets the mood for love.

Good Old-Fashioned Pancakes Recipe

good old-fashioned pancakes recipe

Pancakes have long been a breakfast staple. If you’re craving fluffy, golden, old-fashioned pancakes, this good old-fashioned pancake recipe is for you. Using simple ingredients, it delivers the perfect stack every time. Whether you’re cooking for yourself or your family, these fluffy pancakes are sure to please.

Ingredients

ingredients
  • 1 1/2 cups all-purpose flour
  • 3 1/2 teaspoons baking powder
  • 1 teaspoon salt
  • 1 tablespoon white sugar
  • 1 1/4 cups milk
  • 1 egg
  • 3 tablespoons butter, melted

For variations, consider adding:

  • In a large mixing bowl, sift together the flour, baking powder, salt, and sugar.
  • Make a well in the center and pour in the milk, egg, and melted butter.
  • Whisk until smooth. Avoid overmixing to keep the pancakes light and fluffy.

Instructions

  1. Prepare the Batter
Prepare the Batter
  1. In a large mixing bowl, sift together the flour, baking powder, salt, and sugar.
  2. Make a well in the center and pour in the milk, egg, and melted butter.
  3. Whisk until smooth. Avoid overmixing to keep the pancakes light and fluffy.

  1. Preheat the Pan
Preheat the Pan
  1. Heat a non-stick skillet or griddle over medium heat.
  2. Lightly grease with butter or cooking spray.

  1. Cook the Pancakes
Cook the Pancakes
  1. Pour about 1/4 cup of batter onto the skillet for each pancake.
  2. Cook until bubbles form on the surface and the edges appear set, about 2-3 minutes.
  3. Flip and cook the other side for another 1-2 minutes until golden brown.

Serve

    1. Stack the pancakes on a plate.
    2. Top with syrup, fresh fruit, whipped cream, or butter.
    3. Enjoy while warm.

    Tips for Perfect Pancakes

    • Use fresh ingredients: Baking powder loses its effectiveness over time.
    • Don’t overmix: This prevents dense pancakes.
    • Maintain heat: Keep the skillet consistently hot to cook pancakes evenly.
    • Experiment with toppings: Add chocolate chips, blueberries, or cinnamon to the batter for variety.

    Why Choose This Recipe?

    This good old-fashioned pancake recipe stands out because of its simplicity and versatility. You can adjust the ingredients for dietary preferences, like using almond milk or gluten-free flour. Whether you’re making breakfast for kids, a quick meal for one, or recreating grandma’s old-fashioned pancakes, this recipe delivers.

    Frequently Asked Questions

    Q: Can I make the batter ahead of time? A: Yes, but for best results, cook the pancakes immediately after preparing the batter. If refrigerating, stir the batter lightly before use.

    Q: What if I don’t have buttermilk? A: Use regular milk with a tablespoon of vinegar or lemon juice as a substitute.

    Q: How do I store leftover pancakes? A: Store them in an airtight container in the refrigerator for up to three days. Reheat in a toaster or skillet.

    Q: Can I freeze pancakes? A: Yes, freeze cooked pancakes in a single layer on a baking sheet, then transfer them to a freezer bag. Reheat in the oven or toaster.

    Q: What can I use instead of butter? A: Margarine or coconut oil works as a substitute.

    Enjoy making this “good old-fashioned pancakes recipe” for a delightful breakfast or brunch. The fluffy texture and classic taste will make it a favorite in your home.

    For more inspiration and variations on pancakes, check out these helpful recipes:

    Simply Recipes Banana Bread

    Banana bread is one of the most beloved and versatile recipes, perfect for beginners and experienced bakers alike. This moist and flavorful bread, made with ripe bananas, is simple to prepare and endlessly adaptable. In this article, learn how to make banana bread, explore creative variations, and discover tips to perfect your loaf.

    Ingredients

    banana bread
    • 2 to 3 ripe bananas (mashed)
    • 1/3 cup melted butter (unsalted)
    • 1 teaspoon baking soda
    • Pinch of salt
    • 3/4 cup sugar (adjust to taste)
    • 1 large egg (beaten)
    • 1 teaspoon vanilla extract
    • 1 1/2 cups all-purpose flour

    Instructions

    • Preheat your oven to 350°F (175°C). Grease a 4×8-inch loaf pan.
    banana bread
    • In a mixing bowl, mash the ripe bananas until smooth.
    banana bread
    • Stir in the melted butter.
    whisk together the flour, baking soda, baking powder, cinnamon, pumpkin pie spice, and salt.
    • Mix in baking soda and a pinch of salt.
    • Add sugar, beaten egg, and vanilla extract. Combine well.
    Easy banana bread recipe
    • Gradually fold in the flour until fully incorporated.
    • Pour the batter into the prepared loaf pan.
    Easy moist banana bread recipe
    • Bake for 55-60 minutes. Test with a toothpick; it should come out clean.
    • Allow the banana bread to cool in the pan for 10 minutes. Transfer to a wire rack to cool completely.

    Variations

    • Chocolate Chip Banana Bread: Add 1/2 cup chocolate chips to the batter.
    • Cinnamon Swirl: Swirl in 1 tablespoon of cinnamon mixed with 2 tablespoons of sugar before baking.
    • Applesauce Substitute: Replace butter with applesauce for a healthier option.
    • Oil-Based Recipe: Swap butter with 1/3 cup vegetable oil.
    • No Flour Option: Use almond flour or oat flour instead of all-purpose flour.
    • Without Baking Soda: Use 1 1/2 teaspoons baking powder as a substitute.
    • Nut Cupcakes: Turn the batter into cupcakes and fold in chopped walnuts or pecans.

    Tips for Perfect Banana Bread

    • Use overripe bananas for the best flavor and texture.
    • Avoid overmixing the batter to keep the bread moist.
    • For added moisture, stir in 2 tablespoons of yogurt or sour cream.
    • Store banana bread in an airtight container for up to 3 days or freeze for up to 3 months.

    FAQs

    1. Can I use frozen bananas? Yes. Thaw them first and drain any excess liquid before mashing.

    2. How do I know when the banana bread is done? Insert a toothpick in the center. If it comes out clean, the bread is done.

    3. Can I reduce the sugar? Yes. You can use 1/2 cup sugar or replace it with honey or maple syrup.

    4. What’s the best way to mash bananas? Use a fork or potato masher for a smooth texture.

    5. How can I make banana bread recipe more fluffy? Make sure your baking soda is fresh and avoid overmixing the batter.

    Banana Bread: A Deliciously Simple Recipe for All Occasions

    Lemon Cream Cheese Brownies Recipe

    A stack of lemon cream cheese brownies showing their golden base and creamy lemon layer.

    Lemon cream cheese brownies are a perfect balance of tangy and sweet. They are ideal for dessert lovers who want a refreshing twist to classic brownies. This recipe is easy to make and sure to impress your family and friends.

    Ingredients for Lemon Cream Cheese Brownies Recipe

    For the Brownie Base:

    • 1/2 cup (115g) unsalted butter, melted
    • 1 cup (200g) granulated sugar
    • 2 large eggs
    • 2 teaspoons vanilla extract
    • 1 cup (125g) all-purpose flour
    • 1/4 teaspoon salt

    For the Lemon Cream Cheese Brownies Layer:

    • 8 oz (225g) cream cheese, softened
    • 1/3 cup (65g) granulated sugar
    • 1 large egg
    • 2 tablespoons fresh lemon juice
    • 1 tablespoon lemon zest
    Flat lay of cream cheese, lemons, eggs, butter, flour, and sugar for lemon cream cheese brownies.
    Gather your ingredients for the perfect tangy and sweet dessert.

    Instructions

    1: Prepare the Brownie Base

    1. Preheat your oven to 350°F (175°C). Grease an 8×8-inch baking pan and line it with parchment paper.
    2. In a mixing bowl, combine melted butter and sugar until smooth.
    3. Add eggs and vanilla extract. Mix until fully incorporated.
    4. Gradually fold in flour and salt until the batter is well combined. Spread the mixture evenly into the prepared pan.

    2: Make the Lemon Cream Cheese Layer

    1. In another bowl, beat the cream cheese and sugar until smooth and creamy.
    2. Add the egg, lemon juice, and lemon zest. Mix until well blended.
    3. Pour the lemon cream cheese mixture over the brownie batter, spreading it evenly.

    3: Bake and Cool

    1. Bake in the preheated oven for 25-30 minutes or until the edges are set, and the center is slightly jiggly.
    2. Allow the brownies to cool completely in the pan before transferring them to a cutting board. Chill in the refrigerator for 1-2 hours for best results.
    3. Slice into squares and serve chilled.
    A stack of lemon cream cheese brownies featuring a buttery, golden base, creamy lemon layer, and lemon zest garnish.
    A delightful blend of buttery vanilla and tangy lemon, stacked to showcase their irresistible texture.

    Tips for Perfect Lemon Cream Cheese Brownies

    • Use fresh lemon juice and zest for maximum flavor.
    • Avoid overbaking. The cream cheese layer should remain soft.
    • Line the baking pan with parchment paper for easy removal.
    • Store leftovers in an airtight container in the refrigerator for up to 5 days.
    Close-up of lemon cream cheese brownies with a creamy top layer, garnished with lemon zest.
    Tangy and sweet lemon cream cheese brownies, perfect for any dessert lover.

    FAQs

    1. Can I use a larger pan? Yes, but the brownies will be thinner, and you’ll need to reduce the baking time.

    2. Can I substitute the cream cheese? You can try mascarpone, but the texture and taste will slightly differ.

    3. Can I freeze lemon cream cheese brownies? Yes, wrap them individually in plastic wrap and store in a freezer-safe container for up to 2 months.

    4. What’s the best way to cut brownies cleanly? Use a sharp knife dipped in hot water, and wipe the blade clean after each cut.

    5. Can I double the recipe? Yes, use a 9×13-inch pan and adjust the baking time by 5-10 minutes.

    These lemon cream cheese brownies are a delicious and unique dessert option. Give them a try and elevate your dessert game!

    Pumpkin Chocolate Chip Muffins: A Perfect Blend of Fall Flavors

    vegan pumpkin chocolate chip muffins

    Pumpkin chocolate chip muffins are the ultimate treat for any time of the year. This easy recipe ensures you bake moist and flavorful muffins packed with the goodness of pumpkin and chocolate.


    Why You’ll Love This Recipe

    • Versatile: Can be made vegan, gluten-free, or sugar-free.
    • Healthy: Uses natural sweeteners and wholesome ingredients.
    • Easy to Prepare: Simple steps for a foolproof bake.

    Ingredients for Pumpkin Chocolate Chip Muffins

    Here’s what you’ll need:

    • Wet Ingredients:
      • 1 cup pumpkin puree (unsweetened)
      • 2 large eggs (or flax eggs for vegan)
      • 1/3 cup coconut oil (melted) or unsweetened applesauce
      • 1/2 cup honey or maple syrup
      • 1 teaspoon vanilla extract
    • Dry Ingredients:
      • 1 1/2 cups whole wheat flour (or oat flour for gluten-free)
      • 1 teaspoon baking soda
      • 1/2 teaspoon baking powder
      • 1 teaspoon cinnamon
      • 1/2 teaspoon pumpkin pie spice
      • 1/4 teaspoon salt
    • Extras:
      • 1/2 cup dark chocolate chips (or vegan chocolate chips)

    Step-by-Step Instructions

    • Preheat and Prep: Preheat your oven to 350°F (175°C). Line a 12-cup muffin tin with liners or grease with non-stick spray.

    • Mix Wet Ingredients: In a large bowl, whisk together the pumpkin puree, eggs (or flax eggs), coconut oil or applesauce, honey or maple syrup, and vanilla extract until smooth.
    pumpkin muffins with chocolate chips
    pumpkin muffins with chocolate chips
    • Combine Dry Ingredients: In another bowl, whisk together the flour, baking soda, baking powder, cinnamon, pumpkin pie spice, and salt.
    whisk together the flour, baking soda, baking powder, cinnamon, pumpkin pie spice, and salt.
    • Combine Wet and Dry Mixtures: Slowly add the dry ingredients to the wet ingredients. Mix until just combined—avoid overmixing.
    ingredients
    • Fold in Chocolate Chips: Gently stir in the chocolate chips, saving a handful to sprinkle on top.
    pumpkin chocolate chip muffin
    • Fill the Muffin Tin: Fill the muffin tin with the pumpkin chocolate chip muffins batter, dividing it evenly among the cups.
    chocolate chip and pumpkin muffins
    • Bake: Bake for 18-22 minutes or until a toothpick inserted in the center comes out clean.
    chocolate chip and pumpkin muffins
    chocolate chip and pumpkin muffins
    • Cool and Serve:Once baked, let the pumpkin chocolate chip muffins cool completely before serving.
    chocolate chip and pumpkin muffins

    Tips for Perfect Muffins


    • Add-ins: Customize with nuts, dried fruit, or a sprinkle of oats on top.
    • Storage: Store in an airtight container at room temperature for 3 days or freeze for up to 2 months.
    • Mini Muffins: Reduce the baking time to 12-15 minutes for bite-sized treats.

    pumpkin chocolate chip muffins mini

    FAQs About Pumpkin Chocolate Chip Muffins

    1. Can I make these muffins gluten-free? Yes, substitute the whole wheat flour with oat flour or a gluten-free baking mix.

    2. What is the best oil to use for these muffins? Coconut oil is a great choice, but you can use any neutral oil like canola or vegetable oil. Applesauce is a good alternative for an oil-free option.

    3. Can I reduce the sugar? Absolutely. Use a sugar-free sweetener like monk fruit or reduce the honey/maple syrup.

    4. How can I make them vegan? Use flax eggs (1 tablespoon flaxseed meal + 2.5 tablespoons water per egg) and dairy-free chocolate chips.

    5. Can I make these muffins paleo? Yes, substitute the flour with almond flour and use maple syrup as the sweetener.

    6. Are these muffins kid-friendly? Yes, they are naturally sweetened and packed with nutrients, making them a great snack for kids.


    Check out these other pumpkin chocolate chip muffin recipes for inspiration:


    With this recipe, you’ll enjoy moist, flavorful, and healthy pumpkin chocolate chip muffins that are perfect for breakfast, snacks, or dessert. Experiment with the recipe to suit your preferences and share your results!

    Shrimp Gratin Recipe: A Creamy and Savory Delight

    Shrimp gratin is a satisfying dish that combines tender shrimp with a creamy, cheesy topping. It’s perfect for dinner parties, family meals, or when you want a simple yet elegant dish. This article will guide you through the recipe, preparation steps, and tips to make your shrimp gratin a success.

    Shrimp Gratin

    Ingredients

    For this recipe, you will need:

    • 1 pound (450g) raw shrimp, peeled and deveined
    • 2 tablespoons butter
    • 2 tablespoons all-purpose flour
    • 1 cup milk
    • ½ cup heavy cream
    • 1 cup grated Gruyere or Parmesan cheese
    • ½ cup breadcrumbs
    • 2 garlic cloves, minced
    • 1 small onion, finely chopped
    • 2 tablespoons olive oil
    • 1 teaspoon paprika
    • Salt and pepper to taste
    • Fresh parsley, chopped, for garnish

    Preparation Steps

    1. Preheat the oven to 375°F (190°C).
    2. Cook the shrimp:
      • Heat olive oil in a skillet over medium heat.
      • Add garlic and onion. Sauté until fragrant and translucent.
      • Add shrimp, season with paprika, salt, and pepper, and cook for 2-3 minutes until pink. Set aside.
    3. Make the sauce:
      • In a saucepan, melt butter over medium heat.
      • Whisk in flour and cook for 1-2 minutes until lightly golden.
      • Gradually pour in milk and heavy cream, whisking to avoid lumps. Cook until the mixture thickens.
      • Stir in half the grated cheese until melted. Season with salt and pepper.
    4. Assemble the gratin:
      • Arrange cooked shrimp in a baking dish.
      • Pour the cheese sauce evenly over the shrimp.
      • Sprinkle breadcrumbs and remaining cheese on top.
    5. Bake:
      • Place the baking dish in the preheated oven.
      • Bake for 20 minutes or until golden brown and bubbly.
    6. Garnish and serve:
      • Sprinkle chopped parsley on top.
      • Serve hot with crusty bread or a side salad.

    Tips for Perfect Shrimp Gratin

    • Use fresh shrimp for the best flavor. Frozen shrimp works if thawed properly.
    • Substitute Gruyere with cheddar or mozzarella if preferred.
    • Add a pinch of nutmeg to the cheese sauce for extra flavor.
    • For a crunchier topping, mix breadcrumbs with melted butter before sprinkling.

    Health Benefits

    Shrimp is rich in protein, low in calories, and contains essential nutrients like selenium and vitamin B12. Pairing it with a creamy sauce makes this dish comforting while providing nutritional value.

    FAQs

    1. Can I make shrimp gratin in advance?
    Yes. Assemble the gratin without baking, cover it tightly, and refrigerate for up to 24 hours. Bake just before serving.

    2. Can I use pre-cooked shrimp?
    Yes, but reduce the cooking time during the initial step to avoid overcooking.

    3. Can I freeze shrimp gratin?
    It’s not recommended due to the creamy sauce. Freezing can cause separation.

    4. What can I serve with shrimp gratin?
    Serve it with rice, pasta, or steamed vegetables for a complete meal.

    5. How do I store leftovers?
    Refrigerate leftovers in an airtight container for up to 2 days. Reheat in the oven or microwave.

    This shrimp gratin recipe brings warmth and flavor to your table. Try it today and impress your family and friends.