Simply Recipes Banana Bread

Banana bread is one of the most beloved and versatile recipes, perfect for beginners and experienced bakers alike. This moist and flavorful bread, made with ripe bananas, is simple to prepare and endlessly adaptable. In this article, learn how to make banana bread, explore creative variations, and discover tips to perfect your loaf.

Ingredients

banana bread
  • 2 to 3 ripe bananas (mashed)
  • 1/3 cup melted butter (unsalted)
  • 1 teaspoon baking soda
  • Pinch of salt
  • 3/4 cup sugar (adjust to taste)
  • 1 large egg (beaten)
  • 1 teaspoon vanilla extract
  • 1 1/2 cups all-purpose flour

Instructions

  • Preheat your oven to 350°F (175°C). Grease a 4×8-inch loaf pan.
banana bread
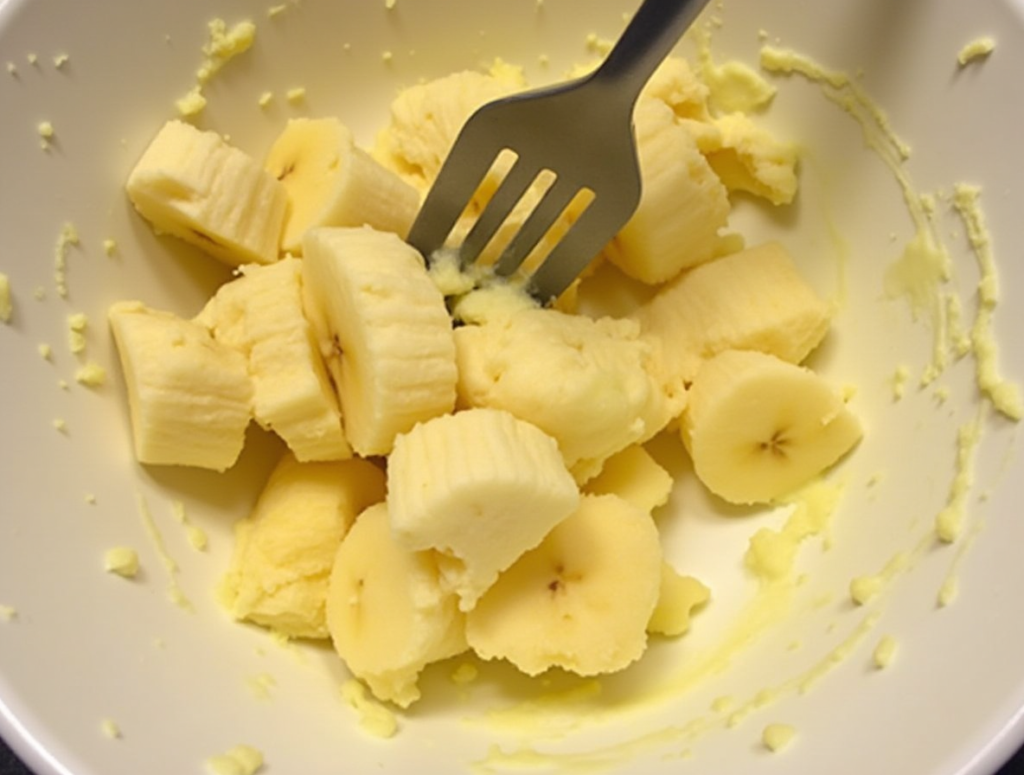
  • In a mixing bowl, mash the ripe bananas until smooth.
banana bread
  • Stir in the melted butter.
whisk together the flour, baking soda, baking powder, cinnamon, pumpkin pie spice, and salt.
  • Mix in baking soda and a pinch of salt.
  • Add sugar, beaten egg, and vanilla extract. Combine well.
Easy banana bread recipe
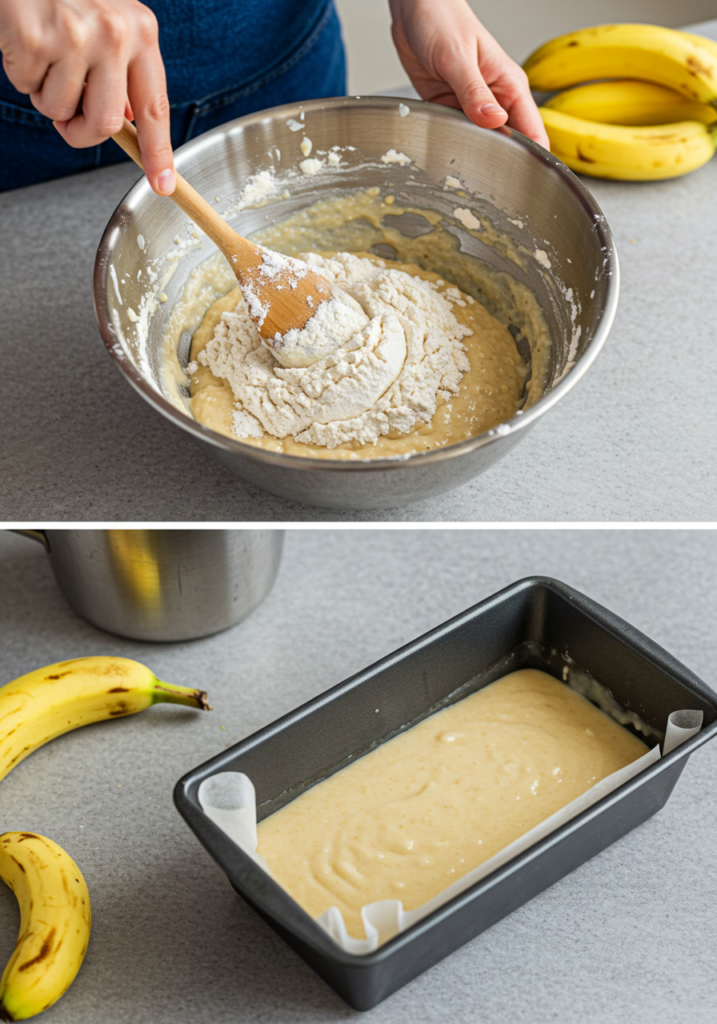
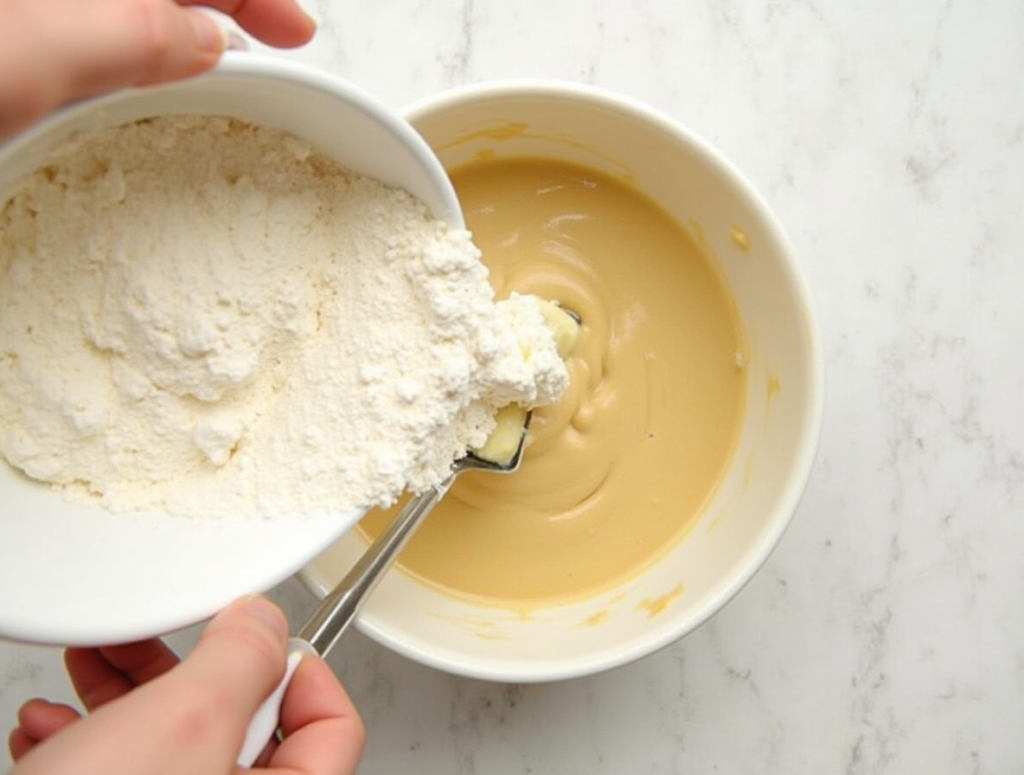
  • Gradually fold in the flour until fully incorporated.
  • Pour the batter into the prepared loaf pan.
Easy moist banana bread recipe
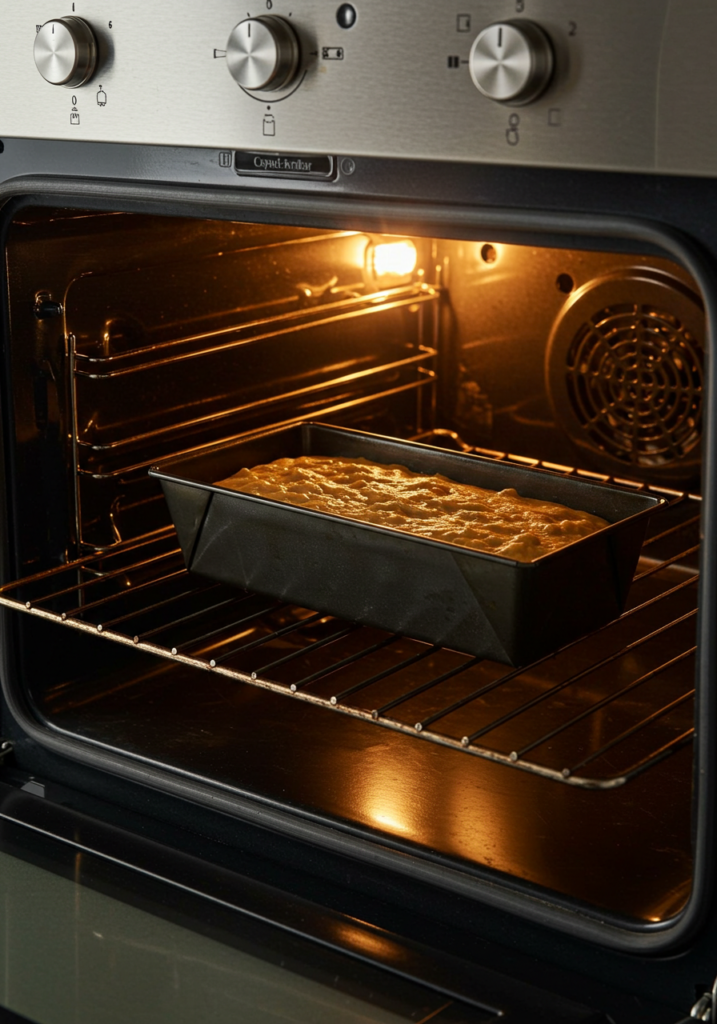
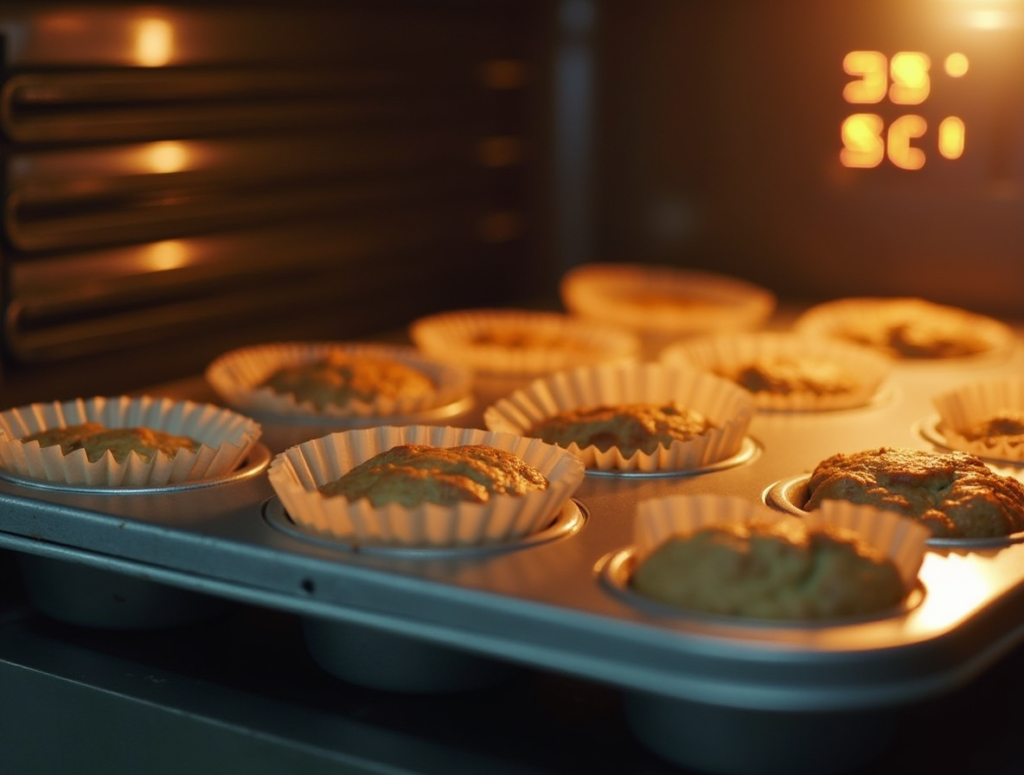
  • Bake for 55-60 minutes. Test with a toothpick; it should come out clean.
  • Allow the banana bread to cool in the pan for 10 minutes. Transfer to a wire rack to cool completely.

Variations

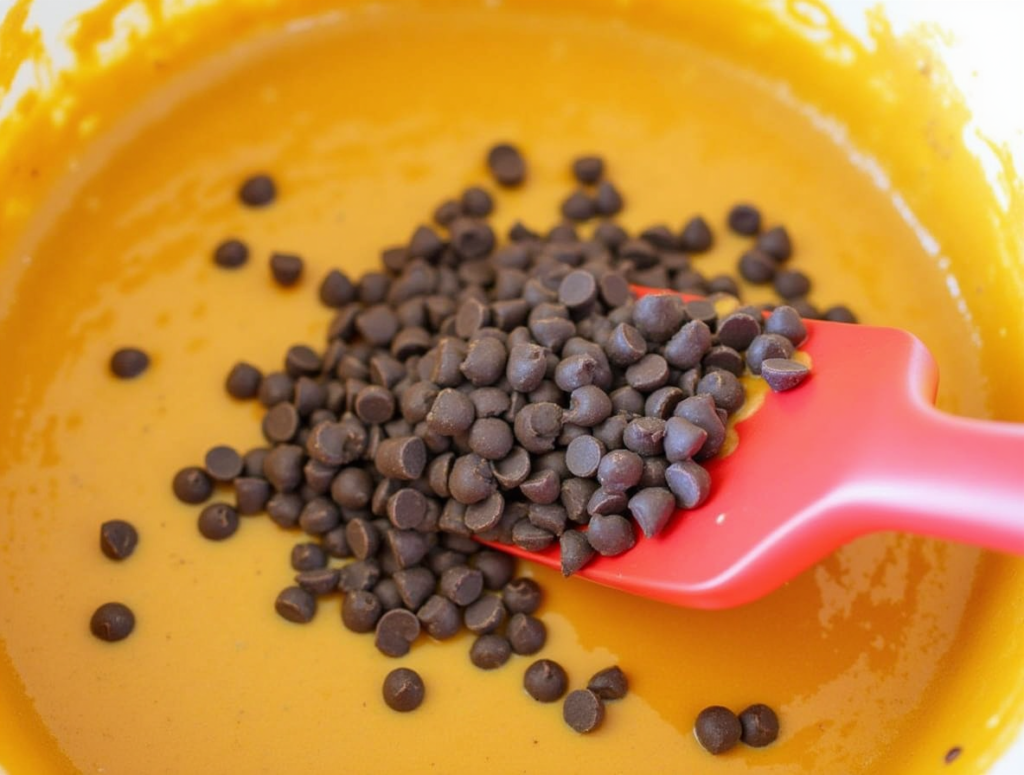
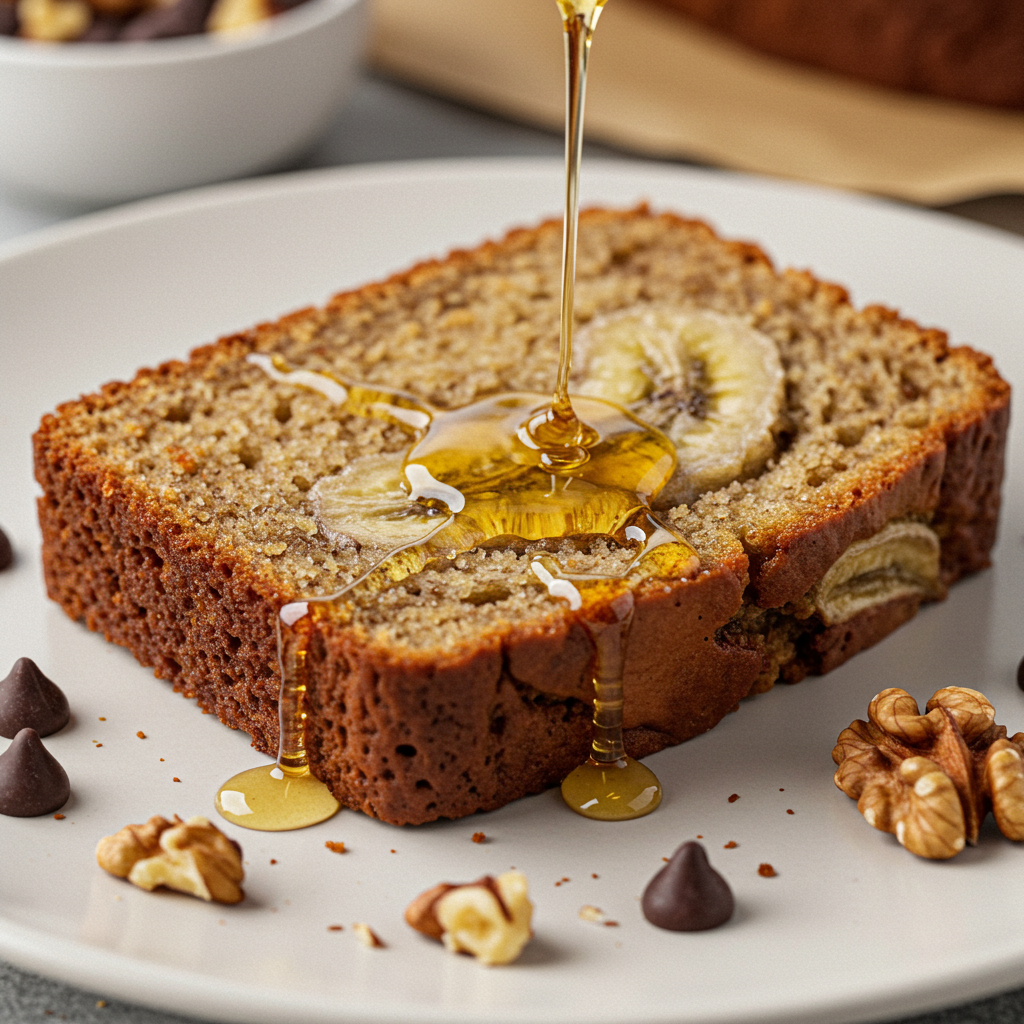
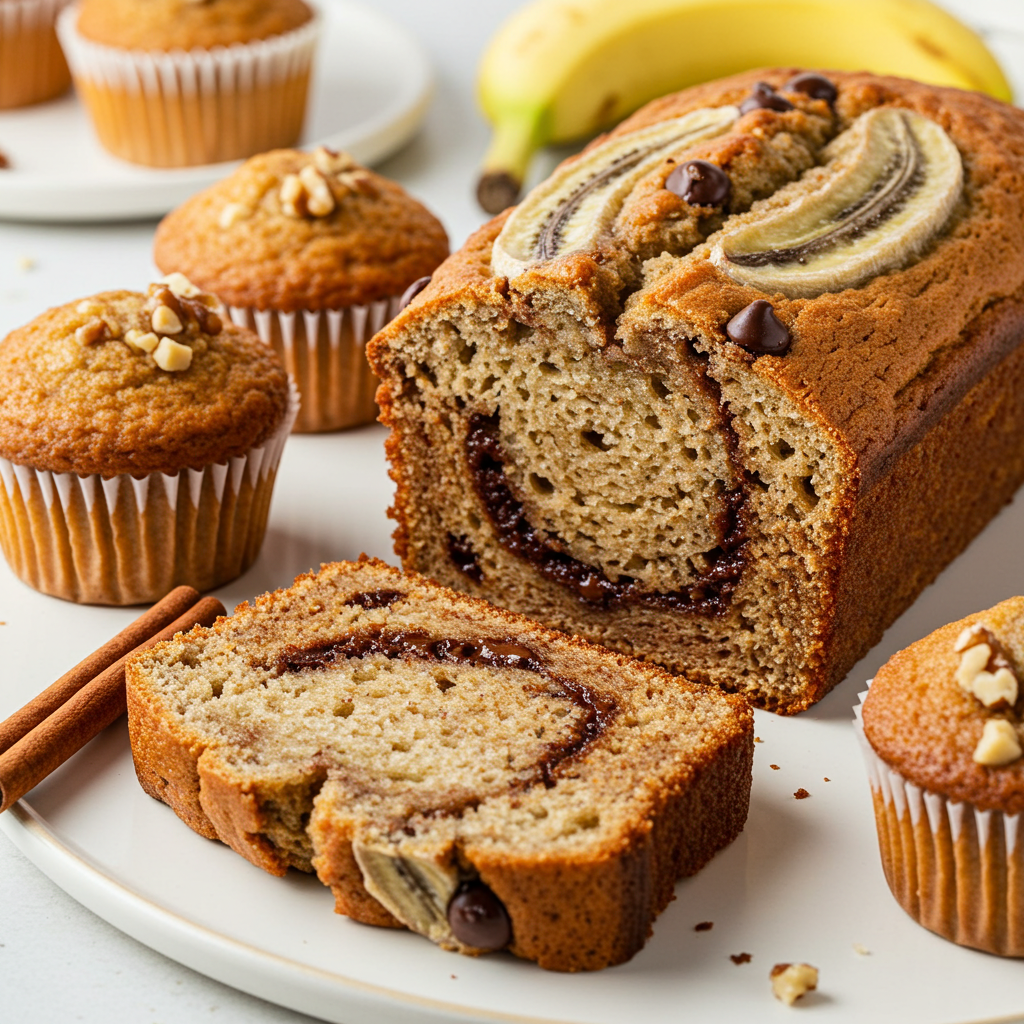
  • Chocolate Chip Banana Bread: Add 1/2 cup chocolate chips to the batter.
  • Cinnamon Swirl: Swirl in 1 tablespoon of cinnamon mixed with 2 tablespoons of sugar before baking.
  • Applesauce Substitute: Replace butter with applesauce for a healthier option.
  • Oil-Based Recipe: Swap butter with 1/3 cup vegetable oil.
  • No Flour Option: Use almond flour or oat flour instead of all-purpose flour.
  • Without Baking Soda: Use 1 1/2 teaspoons baking powder as a substitute.
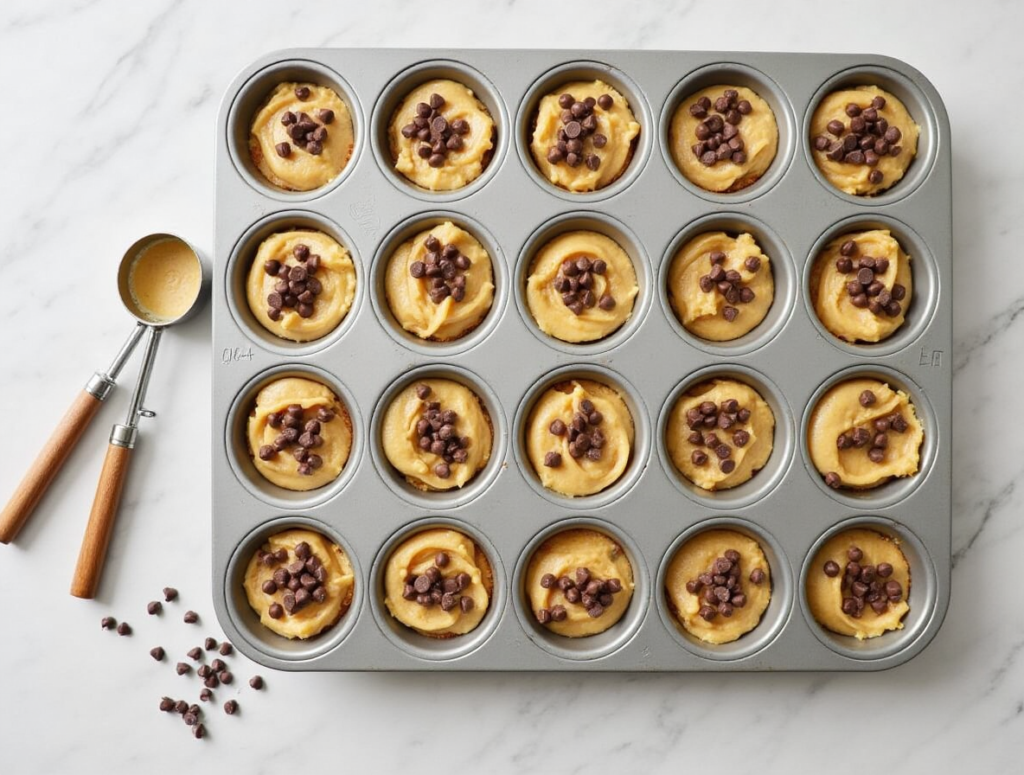
  • Nut Cupcakes: Turn the batter into cupcakes and fold in chopped walnuts or pecans.

Tips for Perfect Banana Bread

  • Use overripe bananas for the best flavor and texture.
  • Avoid overmixing the batter to keep the bread moist.
  • For added moisture, stir in 2 tablespoons of yogurt or sour cream.
  • Store banana bread in an airtight container for up to 3 days or freeze for up to 3 months.

FAQs

1. Can I use frozen bananas? Yes. Thaw them first and drain any excess liquid before mashing.

2. How do I know when the banana bread is done? Insert a toothpick in the center. If it comes out clean, the bread is done.

3. Can I reduce the sugar? Yes. You can use 1/2 cup sugar or replace it with honey or maple syrup.

4. What’s the best way to mash bananas? Use a fork or potato masher for a smooth texture.

5. How can I make banana bread recipe more fluffy? Make sure your baking soda is fresh and avoid overmixing the batter.

Banana Bread: A Deliciously Simple Recipe for All Occasions

Lemon Cream Cheese Brownies Recipe

A stack of lemon cream cheese brownies showing their golden base and creamy lemon layer.

Lemon cream cheese brownies are a perfect balance of tangy and sweet. They are ideal for dessert lovers who want a refreshing twist to classic brownies. This recipe is easy to make and sure to impress your family and friends.

Ingredients for Lemon Cream Cheese Brownies Recipe

For the Brownie Base:

  • 1/2 cup (115g) unsalted butter, melted
  • 1 cup (200g) granulated sugar
  • 2 large eggs
  • 2 teaspoons vanilla extract
  • 1 cup (125g) all-purpose flour
  • 1/4 teaspoon salt

For the Lemon Cream Cheese Brownies Layer:

  • 8 oz (225g) cream cheese, softened
  • 1/3 cup (65g) granulated sugar
  • 1 large egg
  • 2 tablespoons fresh lemon juice
  • 1 tablespoon lemon zest
Flat lay of cream cheese, lemons, eggs, butter, flour, and sugar for lemon cream cheese brownies.
Gather your ingredients for the perfect tangy and sweet dessert.

Instructions

1: Prepare the Brownie Base

  1. Preheat your oven to 350°F (175°C). Grease an 8×8-inch baking pan and line it with parchment paper.
  2. In a mixing bowl, combine melted butter and sugar until smooth.
  3. Add eggs and vanilla extract. Mix until fully incorporated.
  4. Gradually fold in flour and salt until the batter is well combined. Spread the mixture evenly into the prepared pan.

2: Make the Lemon Cream Cheese Layer

  1. In another bowl, beat the cream cheese and sugar until smooth and creamy.
  2. Add the egg, lemon juice, and lemon zest. Mix until well blended.
  3. Pour the lemon cream cheese mixture over the brownie batter, spreading it evenly.

3: Bake and Cool

  1. Bake in the preheated oven for 25-30 minutes or until the edges are set, and the center is slightly jiggly.
  2. Allow the brownies to cool completely in the pan before transferring them to a cutting board. Chill in the refrigerator for 1-2 hours for best results.
  3. Slice into squares and serve chilled.
A stack of lemon cream cheese brownies featuring a buttery, golden base, creamy lemon layer, and lemon zest garnish.
A delightful blend of buttery vanilla and tangy lemon, stacked to showcase their irresistible texture.

Tips for Perfect Lemon Cream Cheese Brownies

  • Use fresh lemon juice and zest for maximum flavor.
  • Avoid overbaking. The cream cheese layer should remain soft.
  • Line the baking pan with parchment paper for easy removal.
  • Store leftovers in an airtight container in the refrigerator for up to 5 days.
Close-up of lemon cream cheese brownies with a creamy top layer, garnished with lemon zest.
Tangy and sweet lemon cream cheese brownies, perfect for any dessert lover.

FAQs

1. Can I use a larger pan? Yes, but the brownies will be thinner, and you’ll need to reduce the baking time.

2. Can I substitute the cream cheese? You can try mascarpone, but the texture and taste will slightly differ.

3. Can I freeze lemon cream cheese brownies? Yes, wrap them individually in plastic wrap and store in a freezer-safe container for up to 2 months.

4. What’s the best way to cut brownies cleanly? Use a sharp knife dipped in hot water, and wipe the blade clean after each cut.

5. Can I double the recipe? Yes, use a 9×13-inch pan and adjust the baking time by 5-10 minutes.

These lemon cream cheese brownies are a delicious and unique dessert option. Give them a try and elevate your dessert game!

Pumpkin Chocolate Chip Muffins: A Perfect Blend of Fall Flavors

vegan pumpkin chocolate chip muffins

Pumpkin chocolate chip muffins are the ultimate treat for any time of the year. This easy recipe ensures you bake moist and flavorful muffins packed with the goodness of pumpkin and chocolate.


Why You’ll Love This Recipe

  • Versatile: Can be made vegan, gluten-free, or sugar-free.
  • Healthy: Uses natural sweeteners and wholesome ingredients.
  • Easy to Prepare: Simple steps for a foolproof bake.

Ingredients for Pumpkin Chocolate Chip Muffins

Here’s what you’ll need:

  • Wet Ingredients:
    • 1 cup pumpkin puree (unsweetened)
    • 2 large eggs (or flax eggs for vegan)
    • 1/3 cup coconut oil (melted) or unsweetened applesauce
    • 1/2 cup honey or maple syrup
    • 1 teaspoon vanilla extract
  • Dry Ingredients:
    • 1 1/2 cups whole wheat flour (or oat flour for gluten-free)
    • 1 teaspoon baking soda
    • 1/2 teaspoon baking powder
    • 1 teaspoon cinnamon
    • 1/2 teaspoon pumpkin pie spice
    • 1/4 teaspoon salt
  • Extras:
    • 1/2 cup dark chocolate chips (or vegan chocolate chips)

Step-by-Step Instructions

  • Preheat and Prep: Preheat your oven to 350°F (175°C). Line a 12-cup muffin tin with liners or grease with non-stick spray.

  • Mix Wet Ingredients: In a large bowl, whisk together the pumpkin puree, eggs (or flax eggs), coconut oil or applesauce, honey or maple syrup, and vanilla extract until smooth.
pumpkin muffins with chocolate chips
  • Combine Dry Ingredients: In another bowl, whisk together the flour, baking soda, baking powder, cinnamon, pumpkin pie spice, and salt.
whisk together the flour, baking soda, baking powder, cinnamon, pumpkin pie spice, and salt.
  • Combine Wet and Dry Mixtures: Slowly add the dry ingredients to the wet ingredients. Mix until just combined—avoid overmixing.
ingredients
  • Fold in Chocolate Chips: Gently stir in the chocolate chips, saving a handful to sprinkle on top.
pumpkin chocolate chip muffin
  • Fill the Muffin Tin: Fill the muffin tin with the pumpkin chocolate chip muffins batter, dividing it evenly among the cups.
chocolate chip and pumpkin muffins
  • Bake: Bake for 18-22 minutes or until a toothpick inserted in the center comes out clean.
chocolate chip and pumpkin muffins
  • Cool and Serve:Once baked, let the pumpkin chocolate chip muffins cool completely before serving.
chocolate chip and pumpkin muffins

Tips for Perfect Muffins


  • Add-ins: Customize with nuts, dried fruit, or a sprinkle of oats on top.
  • Storage: Store in an airtight container at room temperature for 3 days or freeze for up to 2 months.
  • Mini Muffins: Reduce the baking time to 12-15 minutes for bite-sized treats.

pumpkin chocolate chip muffins mini

FAQs About Pumpkin Chocolate Chip Muffins

1. Can I make these muffins gluten-free? Yes, substitute the whole wheat flour with oat flour or a gluten-free baking mix.

2. What is the best oil to use for these muffins? Coconut oil is a great choice, but you can use any neutral oil like canola or vegetable oil. Applesauce is a good alternative for an oil-free option.

3. Can I reduce the sugar? Absolutely. Use a sugar-free sweetener like monk fruit or reduce the honey/maple syrup.

4. How can I make them vegan? Use flax eggs (1 tablespoon flaxseed meal + 2.5 tablespoons water per egg) and dairy-free chocolate chips.

5. Can I make these muffins paleo? Yes, substitute the flour with almond flour and use maple syrup as the sweetener.

6. Are these muffins kid-friendly? Yes, they are naturally sweetened and packed with nutrients, making them a great snack for kids.


Check out these other pumpkin chocolate chip muffin recipes for inspiration:


With this recipe, you’ll enjoy moist, flavorful, and healthy pumpkin chocolate chip muffins that are perfect for breakfast, snacks, or dessert. Experiment with the recipe to suit your preferences and share your results!

Pumpkin Cookies Recipe: Soft, Flavorful, and Perfect for Fall

Pumpkin cookies are a seasonal favorite. Their soft texture, rich flavor, and hint of warm spices make them a must-try treat for autumn. This easy recipe is perfect for beginners and experienced bakers alike.

Pumpkin Cookies

Ingredients of Pumpkin Cookies

For the cookies:

  • 1 cup unsalted butter, softened
  • 1 cup granulated sugar
  • 1/2 cup brown sugar
  • 1 cup canned pumpkin puree
  • 1 large egg
  • 1 teaspoon vanilla extract
  • 2 cups all-purpose flour
  • 1 teaspoon baking soda
  • 1 teaspoon baking powder
  • 1 teaspoon ground cinnamon
  • 1/2 teaspoon ground nutmeg
  • 1/2 teaspoon salt

For the glaze (optional):

  • 1 cup powdered sugar
  • 2 tablespoons milk
  • 1/2 teaspoon vanilla extract
Pumpkin Cookies

Steps to Prepare

1. Prepare the Dough

  • Preheat your oven to 350°F (175°C).
  • In a large mixing bowl, beat the butter, granulated sugar, and brown sugar until creamy.
  • Add the pumpkin puree, egg, and vanilla extract. Mix well.
  • In a separate bowl, whisk together the flour, baking soda, baking powder, cinnamon, nutmeg, and salt.
  • Gradually add the dry ingredients to the wet ingredients, mixing until just combined.
Pumpkin Cookies

2. Shape and Bake

  • Line a baking sheet with parchment paper.
  • Scoop tablespoon-sized portions of the dough onto the sheet, spacing them about 2 inches apart.
  • Bake for 12-15 minutes, or until the edges are slightly golden.
  • Let the cookies cool on the baking sheet for 5 minutes before transferring them to a wire rack to cool completely.
Pumpkin Cookies

3. Add the Glaze (Optional)

  • In a small bowl, mix powdered sugar, milk, and vanilla extract until smooth.
  • Drizzle the glaze over the cooled cookies using a spoon or piping bag.
  • Allow the glaze to set before serving.

Tips for Perfect Pumpkin Cookies

  • Use pure pumpkin puree, not pumpkin pie filling, for the best flavor.
  • For extra spice, add 1/4 teaspoon of ground cloves or ginger.
  • Store cookies in an airtight container at room temperature for up to 4 days, or freeze them for longer storage.
Pumpkin Cookies

Frequently Asked Questions (FAQs)

1. Can I use fresh pumpkin instead of canned? Yes, roast and puree fresh pumpkin until smooth, then measure one cup for this recipe.

2. How can I make these cookies dairy-free? Use dairy-free butter and a plant-based milk alternative for the glaze.

3. Why are my cookies flat? Ensure your butter isn’t overly soft, and don’t skip the baking soda and baking powder. These ingredients help the cookies rise.

4. Can I add mix-ins like chocolate chips or nuts? Absolutely! Fold in a cup of chocolate chips, chopped pecans, or walnuts for added texture and flavor.

These pumpkin cookies are sure to become a fall tradition in your home. Try the recipe and let us know how they turned out in the comments below!

Pumpkin Muffins: The Perfect Fall Treat

Pumpkin muffins are a staple for the fall season. They are easy to make, packed with flavor, and versatile enough for breakfast, snacks, or dessert. Here’s everything you need to know about making pumpkin muffins at home.

Why Pumpkin Muffins?

  • Pumpkin is rich in fiber and vitamins A and C.
  • Muffins are quick to prepare and can be stored for days.
  • They are customizable with add-ins like nuts, chocolate chips, or dried fruits.
Pumpkin Muffins

Ingredients for Pumpkin Muffins

This recipe makes 12 muffins.

  • 1 ¾ cups (220 g) all-purpose flour
  • 1 teaspoon baking soda
  • ½ teaspoon baking powder
  • ½ teaspoon salt
  • 1 teaspoon ground cinnamon
  • ½ teaspoon ground nutmeg
  • ½ teaspoon ground ginger
  • 1 cup (220 g) pumpkin puree
  • ½ cup (120 ml) vegetable oil
  • 2 large eggs
  • ¾ cup (150 g) granulated sugar
  • ½ cup (110 g) brown sugar
  • 1 teaspoon vanilla extract
Pumpkin Muffins

Instructions

  1. Preheat your oven to 350°F (175°C). Line a 12-cup muffin tin with paper liners or grease the cups.
  2. In a medium bowl, whisk together the flour, baking soda, baking powder, salt, cinnamon, nutmeg, and ginger.
  3. In a large bowl, combine the pumpkin puree, vegetable oil, eggs, granulated sugar, brown sugar, and vanilla extract. Mix until smooth.
  4. Gradually fold the dry ingredients into the wet ingredients. Stir until just combined. Do not overmix.
  5. Divide the batter evenly among the muffin cups, filling each about three-quarters full.
  6. Bake for 20–25 minutes, or until a toothpick inserted into the center of a muffin comes out clean.
  7. Let the muffins cool in the pan for 5 minutes, then transfer to a wire rack to cool completely.
Pumpkin Muffins

Tips for Perfect Muffins

  • Use canned pumpkin puree for consistent results. Avoid pumpkin pie filling.
  • Mix wet and dry ingredients gently to prevent dense muffins.
  • Add toppings like streusel, oats, or chopped nuts before baking.

Storage

  • Store in an airtight container at room temperature for up to 3 days.
  • Freeze for up to 3 months. Reheat in the microwave for a quick snack.

FAQs Frequently Asked Questions

Can I use whole wheat flour instead of all-purpose flour?

Yes, but the muffins may be denser. You can use a mix of whole wheat and all-purpose flour.

Can I make these muffins vegan?

Substitute eggs with flax eggs (1 tablespoon ground flaxseed + 2 ½ tablespoons water per egg). Use a neutral vegetable oil or melted coconut oil.

Can I add chocolate chips?

Yes, fold in ¾ cup of chocolate chips into the batter for added sweetness.

How can I tell if my muffins are done?

Insert a toothpick into the center of a muffin. If it comes out clean, they are done.

What if I don’t have muffin liners?

Grease the muffin tin well with cooking spray or butter to prevent sticking.

Making pumpkin muffins is straightforward and rewarding. They offer a taste of the season and can be customized to suit your preferences.

Pecan Upside Down Cake Recipe: A Must-Try Dessert

Pecan upside down cake is a crowd-pleasing dessert with rich, buttery flavors and a caramelized pecan topping. This recipe is easy to follow, perfect for family gatherings, or any time you want to impress your guests. Let’s dive in.

Upside Down Cake

Ingredients

For the pecan topping:

  • 1/2 cup unsalted butter, melted
  • 1 cup light brown sugar, packed
  • 1/4 cup heavy cream
  • 1 1/2 cups pecans, chopped or halved

For the cake:

  • 1 1/2 cups all-purpose flour
  • 1 tsp baking powder
  • 1/4 tsp baking soda
  • 1/4 tsp salt
  • 1/2 cup unsalted butter, softened
  • 3/4 cup granulated sugar
  • 2 large eggs
  • 1 tsp vanilla extract
  • 1/2 cup whole milk
ingredients

Instructions

Prepare the oven and pan.

  • Preheat your oven to 350°F (175°C).
  • Grease a 9-inch round cake pan and line the bottom with parchment paper.
  1. Make the pecan topping.
    • Mix melted butter, brown sugar, and heavy cream until combined.
    • Spread the mixture evenly over the bottom of the prepared pan.
    • Arrange pecans on top of the mixture.
  2. Prepare the cake batter.
    • Whisk flour, baking powder, baking soda, and salt in a bowl.
    • In a separate bowl, cream the butter and sugar until light and fluffy.
    • Add eggs, one at a time, mixing well after each addition.
    • Mix in vanilla extract.
    • Gradually add the dry ingredients to the wet ingredients, alternating with milk, starting and ending with the dry ingredients.
  3. Assemble and bake.
    • Pour the batter evenly over the pecan topping.
    • Smooth the top with a spatula.
    • Bake for 35-40 minutes or until a toothpick inserted in the center comes out clean.
  4. Cool and flip.
    • Let the cake cool in the pan for 10 minutes.
    • Carefully run a knife around the edges and invert the cake onto a serving plate.
    • Remove the parchment paper and allow the cake to cool completely.
Pekan Upside Down Cake

Tips for Success

  • Use fresh pecans for the best flavor.
  • Make sure to grease the pan thoroughly to avoid sticking.
  • Serve with whipped cream or vanilla ice cream for an extra treat.

Why You’ll Love This Recipe

  • Combines the crunch of pecans with a moist cake texture.
  • Ideal for special occasions and holidays.
  • Simple ingredients with a show-stopping result.
Pekan Upside Down Cake

FAQs Frequently Asked Questions

Can I use a different type of nut?
Yes, walnuts or almonds are great substitutes, but pecans provide the most authentic flavor.

Can I make this cake ahead of time?
You can prepare it a day in advance. Store it covered at room temperature or in the fridge.

What’s the best way to store leftovers?
Wrap leftovers tightly and store them in the refrigerator for up to five days.

Can I freeze pecan upside down cake?
Yes, wrap it in plastic wrap and aluminum foil, then freeze for up to three months.

Can I use a boxed cake mix?
Yes, substitute the homemade cake batter with a yellow or butter cake mix for a quicker option.

This pecan upside down cake is guaranteed to impress. Make it your go-to dessert for any occasion.

The Perfect Tiramisu Recipe: An Italian Classic You Can Master

Tiramisu is a beloved Italian dessert that blends rich coffee, creamy mascarpone, and delicate ladyfingers. This guide will help you make an authentic Tiramisu that impresses every time.

Ingredients of Tiramisu

  • Ladyfingers (Savoiardi): 200g
  • Mascarpone cheese: 500g
  • Eggs: 4 large (separated)
  • Granulated sugar: 100g
  • Espresso coffee: 300ml (cooled)
  • Cocoa powder: 2 tablespoons (for dusting)
  • Dark chocolate shavings: Optional (for garnish)
  • Marsala wine or coffee liqueur: 2 tablespoons (optional)

Step-by-Step Tiramisu instructions

1. Prepare the Coffee Base

  • Brew 300ml of strong espresso and let it cool.
  • Add Marsala wine or coffee liqueur for an extra depth of flavor (optional).

2. Whisk the Egg Yolks and Sugar

  • In a bowl, beat the egg yolks and sugar until the mixture is pale and creamy.
  • Gently fold in the mascarpone until smooth.

3. Whip the Egg Whites

  • In another bowl, whisk the egg whites to stiff peaks.
  • Carefully fold the whipped egg whites into the mascarpone mixture to create a light and airy texture.

4. Layer the Tiramisu

  • Quickly dip each ladyfinger into the cooled espresso. Avoid soaking to prevent sogginess.
  • Arrange a layer of dipped ladyfingers at the bottom of a rectangular dish.
  • Spread half of the mascarpone mixture evenly over the ladyfingers.
  • Add another layer of dipped ladyfingers on top.
  • Spread the remaining mascarpone mixture over the second layer.

5. Chill and Garnish

  • Cover the dish with plastic wrap and refrigerate for at least 4 hours (preferably overnight).
  • Before serving, dust the top with cocoa powder.
  • Add chocolate shavings for an extra touch (optional).

Tips for Success

  • Use fresh eggs for the best taste and texture.
  • Let the Tiramisu chill overnight to allow the flavors to meld.
  • Always use high-quality mascarpone and espresso.

Nutritional Information (Per Serving)

  • Calories: 350
  • Protein: 7g
  • Fat: 22g
  • Carbohydrates: 28g

Frequently Asked Questions

1. Can I make Tiramisu without alcohol? Yes, simply omit the Marsala wine or coffee liqueur.

2. Can I use cream instead of mascarpone? Mascarpone is essential for authenticity, but heavy cream can be a substitute in a pinch.

3. How long does Tiramisu last in the fridge? Tiramisu can be stored for up to 3 days in the refrigerator.

4. Can I make a non-coffee version? Replace espresso with hot chocolate or milk for a kid-friendly variation.

5. Is Tiramisu safe for pregnant women? Use pasteurized eggs or egg-free alternatives to make it safe.

Mastering Tiramisu is easier than it looks. With this recipe, you can create a restaurant-quality dessert in your own kitchen. Share it with friends and family for a true taste of Italy.

Irresistible Pecan Turtle Bars Recipe: Perfect for Every Occasion

If you’re craving a dessert that’s both indulgent and easy to make, pecan turtle bars are your answer. Combining the rich flavors of caramel, chocolate, and pecans over a buttery shortbread crust, these bars are perfect for any occasion, whether it’s a casual snack or a festive gathering. Let’s dive into this irresistible recipe while keeping things optimized for your sweet tooth and SEO!

Ingredients of Pecan Turtle Bars

For the Shortbread Crust:

  • 1 cup (230g) unsalted butter, softened
  • 2 cups (250g) all-purpose flour
  • ½ cup (100g) granulated sugar
  • ¼ tsp salt

the Caramel Layer:

  • 1 cup (200g) granulated sugar
  • ½ cup (120ml) heavy cream
  • 6 tbsp (85g) unsalted butter
  • ¼ tsp salt

the Topping:

  • 1 cup (175g) semi-sweet chocolate chips
  • 1 cup (120g) chopped pecans
Pecan Turtle Bars

Instructions: How to Make Pecan Turtle Bars

1: Prepare the Crust

  1. Preheat your oven to 350°F (175°C). Grease a 9×13-inch (23×33 cm) baking pan and line it with parchment paper, leaving some overhang for easy removal.
  2. In a mixing bowl, combine softened butter, sugar, flour, and salt. Mix until the dough is crumbly.
  3. Press the dough evenly into the prepared pan. Bake for 20-25 minutes or until golden. Set aside to cool.

2: Make the Caramel

  1. In a medium saucepan, combine sugar, butter, and heavy cream over medium heat.
  2. Stir continuously until the mixture comes to a boil. Reduce heat to medium-low and cook for about 5-7 minutes, stirring occasionally, until the caramel thickens slightly.
  3. Pour the caramel over the cooled crust, spreading it evenly.

3: Add the Topping

  1. Sprinkle chopped pecans evenly over the caramel layer.
  2. Melt the chocolate chips in a microwave-safe bowl, heating in 20-second intervals and stirring until smooth.
  3. Drizzle the melted chocolate over the pecans. Use a fork or spatula to create a marbled effect if desired.
Pecan Turtle Bars

4: Chill and Serve

  1. Refrigerate the bars for at least 2 hours or until firm.
  2. Remove from the pan using the parchment overhang and cut into squares or bars.
  3. Serve and enjoy your pecan turtle bars!
Pecan Turtle Bars

Why You’ll Love These Bars

  • Time-Saving: Perfect for those who want a gourmet dessert without spending hours in the kitchen.
  • Customizable: Swap semi-sweet chocolate for dark or milk chocolate to suit your taste.
  • Make-Ahead Friendly: Store them in an airtight container in the fridge for up to a week.
Pecan Turtle Bars

Frequently Asked Questions (FAQs)

Q: Can I use store-bought caramel instead of making my own? A: Absolutely! While homemade caramel adds a fresh touch, store-bought caramel sauce is a great time-saving alternative.

Q: How do I prevent the chocolate from cracking when cutting the bars? A: Use a warm knife to slice through the bars. Simply dip the knife in hot water, wipe it dry, and cut.

Q: Are there other nuts I can use? A: Yes! Walnuts or almonds work well if pecans aren’t your favorite or aren’t available.

Q: Can I make these bars gluten-free? A: Swap the all-purpose flour in the crust with a gluten-free baking blend for a gluten-free treat.

Q: What’s the best way to store these bars? A: Keep them in an airtight container in the fridge. For longer storage, freeze them for up to 2 months.

Whether you’re new to baking or a seasoned pro, these pecan turtle bars will surely impress your family and friends. Try the recipe and let us know how it turns out in the comments below!

Chocolate Brownie Cookies Recipe: The Ultimate Indulgence

If you’ve ever been torn between the rich, fudgy goodness of brownies and the chewy perfection of cookies, this recipe is for you. Chocolate Brownie Cookies combine the best of both worlds into one irresistible treat. These cookies are rich, gooey, and chocolatey, with the signature crackly tops of brownies—perfect for chocolate lovers!

In this article, we’ll guide you through the recipe step by step, include some tips for baking success, and answer frequently asked questions to ensure your cookies turn out perfectly every time.

Chocolate Brownie Cookies

Ingredients for Chocolate Brownie Cookies

Gather these ingredients for about 18-20 cookies:

Dry Ingredients:
  • 1/2 cup (60g) all-purpose flour
  • 1/4 tsp baking powder
  • 1/4 tsp salt
Wet Ingredients:
  • 2 cups (340g) semi-sweet chocolate chips
  • 1/4 cup (56g) unsalted butter
  • 3/4 cup (150g) granulated sugar
  • 1/4 cup (50g) brown sugar
  • 2 large eggs
  • 1 tsp vanilla extract
Optional Add-ins:
  • 1/2 cup chopped nuts (walnuts or pecans)
  • 1/2 cup white chocolate chips or dark chocolate chunks
Chocolate Brownie Cookies

Step-by-Step Instructions

1. Preheat the Oven
  • Preheat your oven to 350°F (175°C) and line two baking sheets with parchment paper.
2. Melt the Chocolate and Butter
  • In a microwave-safe bowl, melt the semi-sweet chocolate chips and unsalted butter together in 20-second intervals, stirring between each interval until smooth. Let it cool slightly.
3. Mix the Dry Ingredients
  • In a separate bowl, whisk together the flour, baking powder, and salt.
4. Combine Wet Ingredients
  • In a large mixing bowl, beat the eggs, granulated sugar, and brown sugar together until light and creamy (about 2 minutes). Add the vanilla extract and the slightly cooled chocolate mixture, then mix until combined.
Chocolate Brownie Cookies
5. Incorporate Dry Ingredients
  • Slowly fold the dry ingredients into the wet mixture until just combined. Avoid overmixing to keep the batter tender.
6. Add Chocolate Chunks or Nuts (Optional)
  • If desired, gently fold in chopped nuts or extra chocolate chunks for added texture and flavor.
7. Scoop and Bake
  • Using a cookie scoop or tablespoon, drop spoonfuls of batter onto the prepared baking sheets, leaving about 2 inches between each cookie.
  • Bake for 10-12 minutes, or until the tops are crackly and the edges are set but the centers look slightly soft. This gives the cookies their signature brownie-like texture.
Chocolate Brownie Cookies
8. Cool and Serve
  • Allow the cookies to cool on the baking sheet for 5 minutes before transferring them to a wire rack to cool completely. Enjoy them warm or at room temperature!

Tips for the Perfect Chocolate Brownie Cookies

  1. Don’t overbake: The cookies will continue to cook on the baking sheet after removing them from the oven. Take them out when the centers are slightly soft for the best texture.
  2. Use high-quality chocolate: Since chocolate is the star of the recipe, opt for good-quality chocolate chips or baking chocolate.
  3. Chill the dough (optional): If the dough feels too runny, refrigerate it for 10-15 minutes before scooping.
  4. Double the batch: These cookies disappear fast, so you might want to make extra!
Chocolate Brownie Cookies

FAQs About Chocolate Brownie Cookies

1. Can I freeze the dough?

Yes! Scoop the cookie dough onto a baking sheet and freeze until solid, then transfer to a freezer bag. Bake from frozen, adding 1-2 minutes to the baking time.

2. How should I store these cookies?

Store them in an airtight container at room temperature for up to 5 days. For longer storage, freeze them in a sealed container for up to 3 months.

3. Can I use dark chocolate instead of semi-sweet?

Absolutely! Dark chocolate will make the cookies even richer. Adjust the sweetness to your taste by reducing the sugar slightly.

4. Why didn’t my cookies get crackly tops?

This usually happens if the melted chocolate mixture is too hot when combined with the eggs. Let it cool slightly to avoid this.

5. Can I make these gluten-free?

Yes! Substitute the all-purpose flour with a gluten-free baking blend. The texture might differ slightly but will still be delicious.


These Chocolate Brownie Cookies are perfect for any occasion, whether you’re hosting a party or indulging in a midnight treat. With their fudgy centers and crisp edges, they’ll quickly become a household favorite. Bake a batch today and enjoy the magic of brownies and cookies in one bite!