Bake the Perfect Red Velvet Cake: Easy Recipe.

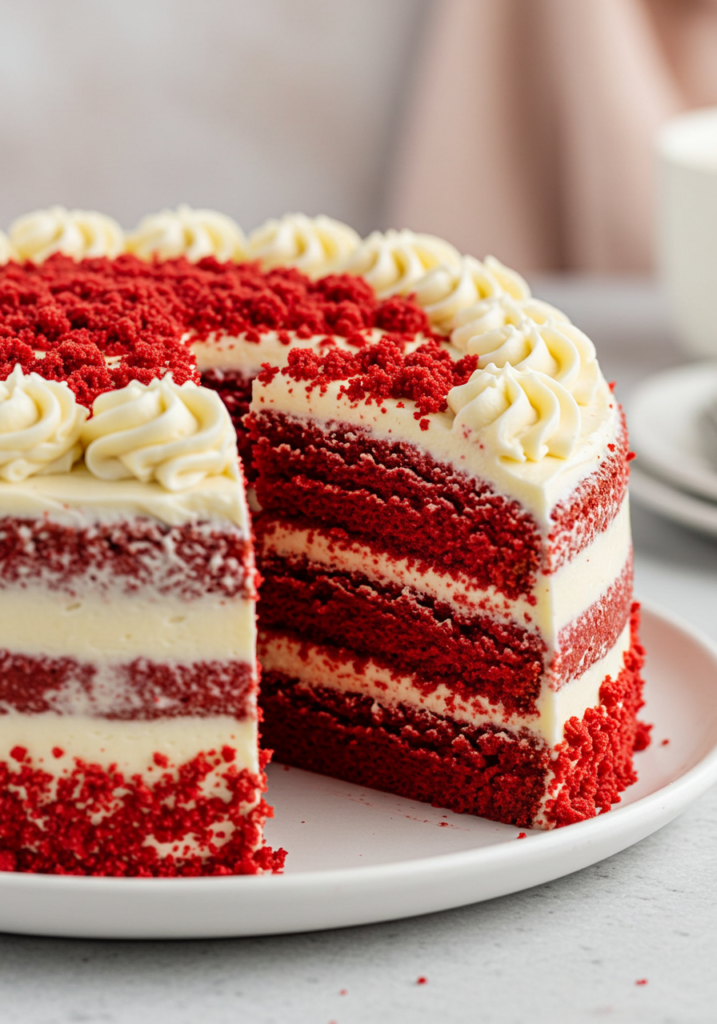
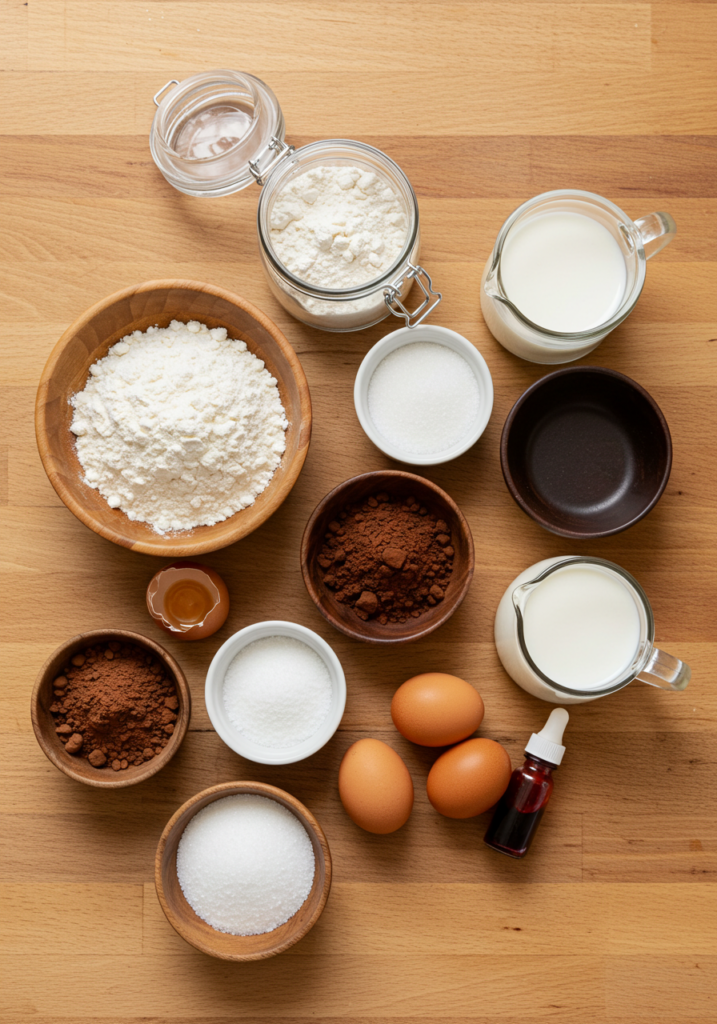
Red Velvet cake is a ca1 cup (240ml) buttermilk, room temperature

  • 2 large eggs, room temperature
  • 2 tablespoons (30ml) red food coloring
  • 1 teaspoon vanilla extract
  • 1 teaspoon white vinegar

For the frosting:

  • 8 oz (226g) cream cheese, softened
  • 1/2 cup (115g) unsalted butter, softened
  • 4 cups (480g) powdered sugar, sifted
  • 1 teaspoon vanilla extract
Red Velvet Cake ingredient

Steps:

  1. Preheat and Prepare: Preheat your oven to 350°F (175°C). Grease and flour two 9-inch (23 cm) round cake pans or line them with parchment paper.
  2. Mix Dry Ingredients: In a large bowl, sift together the flour, sugar, baking soda, salt, and cocoa powder.
  3. Combine Wet Ingredients: In another bowl, whisk together the vegetable oil, buttermilk, eggs, red food coloring, vanilla extract, and vinegar until smooth.
  4. Blend: Gradually add the wet ingredients to the dry ingredients, mixing until just combined. Do not overmix.
  5. Bake: Divide the batter evenly between the prepared cake pans. Bake for 25-30 minutes, or until a toothpick inserted into the center comes out clean.
  6. Cool: Let the cakes cool in the pans for 10 minutes, then transfer to a wire rack to cool completely.
  7. Prepare Frosting: In a large bowl, beat the cream cheese and butter together until smooth. Gradually add the powdered sugar, one cup at a time, beating well after each addition. Stir in the vanilla extract.
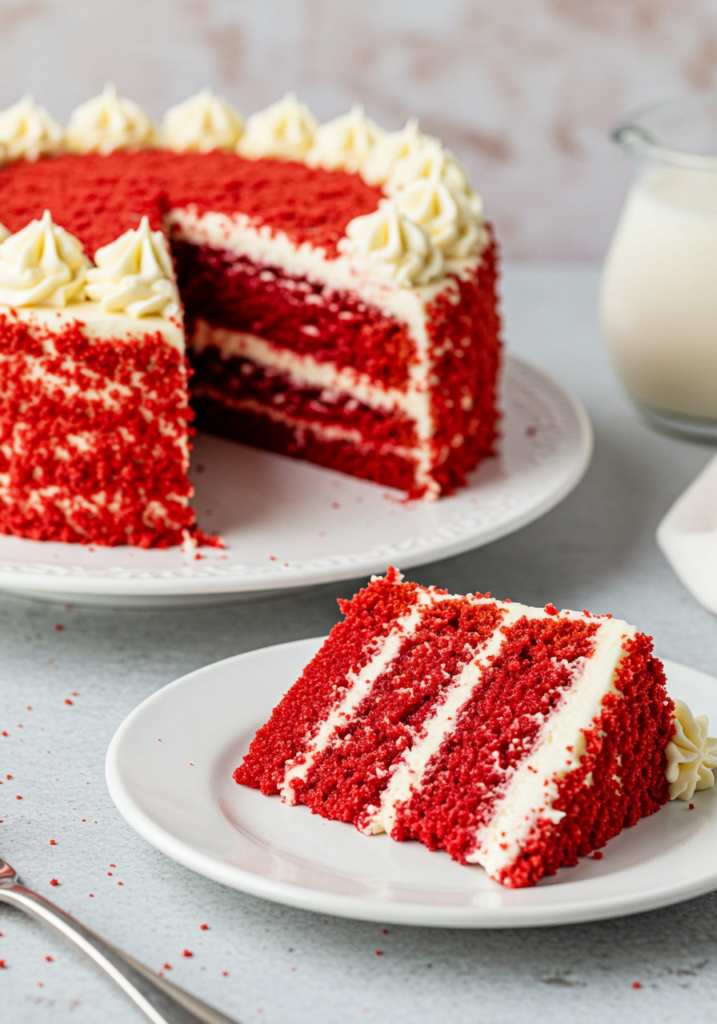
  8. Assemble: Place one cake layer on a serving plate. Spread a generous layer of frosting on top. Add the second cake layer and frost the top and sides. Decorate as desired.
  9. Serve: Slice and enjoy your homemade Red Velvet cake!
Red Velvet Cake

Tips for the Perfect Red Velvet

  • Room Temperature Ingredients: Ensure eggs, buttermilk, and cream cheese are at room temperature for smoother mixing.
  • Don’t Overmix: Overmixing can make the cake dense and chewy instead of light and fluffy.
  • Use Gel Food Coloring: Gel food coloring provides a more vibrant red without altering the batter’s consistency.

FAQs

Q: Can I make Red Velvet cake without food coloring? A: Yes, you can skip the food coloring. The cake will have a natural reddish-brown hue due to the cocoa powder and buttermilk reaction.

Q: Can I substitute buttermilk? A: If you don’t have buttermilk, mix 1 tablespoon of vinegar or lemon juice with 1 cup of milk. Let it sit for 5 minutes before using.

Q: How do I store Red Velvet cake? A: Store the cake in an airtight container in the refrigerator for up to 5 days. Bring it to room temperature before serving.

Q: Can I freeze Red Velvet cake? A: Yes, you can freeze the unfrosted cake layers. Wrap them tightly in plastic wrap and foil, and store in the freezer for up to 3 months. Thaw before frosting.

Q: What cake is Red Velvet made of? A: Red Velvet is a type of layer cake made with cocoa powder, buttermilk, vinegar, and a hint of food coloring to achieve its signature red hue. The combination of ingredients creates its soft, velvety texture.

Q: What is the flavor of Red Velvet cake? A: a subtle chocolate flavor with a tangy twist from the buttermilk and a creamy sweetness from the cream cheese frosting.

Q: Is Red Velvet just red chocolate cake? A: While Red Velvet contains cocoa powder, it’s not just a chocolate cake dyed red. The recipe includes buttermilk and vinegar, which add tanginess and affect the texture, making it lighter and more delicate than traditional chocolate cake.

Q: What causes Red Velvet ? A: The red color in Red Velvet is traditionally a result of the chemical reaction between cocoa powder, vinegar, and buttermilk. Today, food coloring is often added to enhance the vibrant red hue.

The Perfect Chocolate Lava Cake Recipe: A Sweet Delight for Any Occasion

Introduction

Chocolate lava cake, also known as molten chocolate cake, is a dessert lover’s dream come true. Its soft outer layer encases a gooey chocolate center, creating a heavenly combination. This dessert works perfectly for romantic dinners, family gatherings, or as a personal indulgence. In this article, we’ll guide you through a simple, foolproof recipe for chocolate lava cake. Additionally, we’ll share some tips to ensure your dessert is a success and answer frequently asked questions about this delightful treat.

Chocolate Lava Cake

Ingredients of Chocolate Lava Cake

For this recipe, you will need:

  • 200g of dark chocolate (70% cocoa recommended)
  • 100g of unsalted butter (plus extra for greasing)
  • 2 large eggs
  • 2 large egg yolks
  • 100g of granulated sugar
  • 50g of all-purpose flour
  • 1 teaspoon of vanilla extract
  • A pinch of salt
  • Optional: Powdered sugar, fresh berries, or a scoop of vanilla ice cream for garnish
Chocolate Lava Cake

Essential Equipment for Making Molten Chocolate Lava Cake

  • Mixing bowls
  • Whisk or electric mixer
  • Ramekins or oven-safe molds
  • Baking tray

Instructions for Perfect Chocolate Lava Cake

1: Prepare the Ramekins

Begin by preheating your oven to 200°C (390°F). Generously butter the ramekins and lightly dust them with flour or cocoa powder to prevent sticking. Set them aside for later use.

2: Melt Chocolate and Butter

Next, melt the chocolate and butter together in a heatproof bowl. Use a double boiler or microwave in 30-second intervals, stirring until smooth. Allow the mixture to cool slightly.

3: Whisk the Eggs and Sugar

In a separate bowl, whisk together the eggs, egg yolks, and granulated sugar. Continue whisking until the mixture becomes pale and fluffy.

4: Combine Ingredients

Slowly pour the melted chocolate mixture into the egg mixture. Whisk constantly to ensure everything is well incorporated. Then, add the vanilla extract, pinch of salt, and sifted flour. Gently fold the ingredients until the batter is smooth.

Chocolate Lava Cake
5: Fill and Bake

Divide the batter evenly among the prepared ramekins, filling each about three-quarters full. Place the ramekins on a baking tray and bake for 10-12 minutes. The edges should be set while the center remains soft for that perfect molten texture.

Chocolate Lava Cake
6: Serve Immediately

After baking, let the cakes rest for 1-2 minutes. Carefully invert them onto serving plates. Garnish with powdered sugar, fresh berries, or a scoop of vanilla ice cream. Serve warm and savor the molten chocolate goodness!

Chocolate Lava Cake

Tips for Perfect Chocolate Lava Cake

  • Use Quality Chocolate: The flavor of your lava cake largely depends on the quality of chocolate you use. Opt for high-quality dark chocolate for the best results.
  • Don’t Overbake: Keep a close eye on your cakes as they bake. Overbaking will result in a fully cooked center, losing the signature molten texture.
  • Prep in Advance: You can prepare the batter ahead of time and refrigerate it in the ramekins. Just add an extra minute to the baking time if baking straight from the fridge.
  • Experiment with Flavors: Adding espresso powder, orange zest, or a pinch of cinnamon to the batter can offer a unique twist.
Chocolate Lava Cake

FAQs Frequently Asked Questions About Chocolate Lava Cake

1. Can I make chocolate lava cake without ramekins?

Yes! Oven-safe muffin tins or silicone molds can be excellent alternatives. Just adjust the baking time slightly.

2. Can I store leftover lava cakes?

While chocolate lava cake are best enjoyed fresh, you can store leftovers in the fridge for up to 2 days. Reheat gently in the microwave for about 10-15 seconds before serving.

3. Can I make a gluten-free version?

Absolutely! Substitute the all-purpose flour with almond flour or a gluten-free flour blend. While the texture may vary slightly, the flavor remains delightful.

4. Why is my lava cake too runny or too firm?

The key to a perfect lava cake lies in timing. Baking for too little time results in an overly runny cake, while too much time leads to a firm center. Follow the recipe instructions closely and monitor your oven.

5. What can I serve with chocolate lava cake?

Chocolate lava cake pairs beautifully with vanilla ice cream, whipped cream, or a drizzle of raspberry sauce. These additions elevate the dessert to a whole new level.

Conclusion

Chocolate lava cake is a decadent dessert that’s surprisingly simple to make. By using the right ingredients and paying attention to the details, you can create a show-stopping dessert that will impress anyone. Whether for a special occasion or a weeknight treat, this recipe is sure to become a favorite in your kitchen.

How to Make the Best Fudgy Brownies

Why These Brownies Are a Must-Try

Brownies are the perfect treat for any occasion. Whether you’re hosting guests or craving a sweet indulgence, this recipe combines rich chocolate flavor with a gooey texture that melts in your mouth. These fudgy brownies are easy to make and customizable to suit your taste.

Fudgy Brownies

Ingredients

For the Brownie Batter:

  • 200g dark chocolate (at least 70% cocoa)
  • 150g unsalted butter
  • 200g granulated sugar
  • 100g brown sugar
  • 3 large eggs (room temperature)
  • 1 tsp vanilla extract
  • 100g all-purpose flour
  • 30g cocoa powder
  • 1/4 tsp salt

Optional Add-ins:

  • 50g chopped walnuts
  • 50g chocolate chips
  • 1/4 cup dried cranberries
Fudgy Brownies

Instructions

1: Prepare Your Workspace
  1. Preheat your oven to 175°C (350°F).
  2. Line a 9×9-inch baking pan with parchment paper.
  3. Grease the edges lightly with butter or non-stick spray.
2: Melt Chocolate and Butter
  1. In a heatproof bowl, combine the dark chocolate and butter.
  2. Melt over a double boiler or in the microwave (in 30-second intervals).
  3. Stir until smooth and let it cool slightly.
3: Mix the Wet Ingredients
  1. In a mixing bowl, combine the granulated sugar, brown sugar, and eggs.
  2. Whisk for 2-3 minutes until the mixture becomes pale and fluffy.
  3. Add the vanilla extract and the melted chocolate mixture. Mix well.
4: Sift and Combine the Dry Ingredients
  1. In a separate bowl, sift together the flour, cocoa powder, and salt.
  2. Gradually fold the dry ingredients into the wet ingredients using a spatula.
  3. Avoid overmixing to maintain the fudgy texture.
5: Add Toppings and Bake
  1. Stir in any optional add-ins (walnuts, chocolate chips, etc.).
  2. Pour the batter into the prepared pan and spread evenly.
  3. Bake for 25-30 minutes or until a toothpick inserted in the center comes out with a few moist crumbs.
  4. Let the brownies cool completely in the pan before slicing.
Fudgy Brownies

Tips for Perfect Brownies

  • Don’t overbake: Check your brownies at the 25-minute mark. Overbaking leads to a dry texture.
  • Use quality chocolate: This elevates the flavor significantly.
  • Customize the toppings: Add a drizzle of caramel or a sprinkle of sea salt for extra flavor.
Fudgy Brownies

FAQs

What’s the difference between fudgy and cakey brownies?

Fudgy brownies have a higher fat-to-flour ratio, while cakey brownies have more flour and rely on baking powder for a lighter texture.

Can I make brownies without eggs?

Yes, substitute eggs with ingredients like mashed banana, applesauce, or a flaxseed mixture (1 tbsp flaxseed meal + 2.5 tbsp water per egg).

How should I store brownies?

Store brownies in an airtight container at room temperature for up to 3 days. For longer storage, refrigerate for up to a week or freeze for up to a month.

Can I use milk chocolate instead of dark chocolate?

Yes, but the flavor will be sweeter and less intense. Adjust the sugar accordingly.

How do I make my brownies extra gooey?

Reduce the baking time slightly and let the brownies cool before cutting to maintain a gooey center.

This recipe ensures you’ll create the perfect brownies every time. Try it and share your results!

Fluffy Pancakes Recipe

Pancakes are a breakfast favorite loved by many. These light and fluffy pancakes are quick to prepare and perfect for any morning.

Ingredients for Pancakes

  • 1 1/2 cups all-purpose flour
  • 3 1/2 teaspoons baking powder
  • 1 teaspoon salt
  • 1 tablespoon granulated sugar
  • 1 1/4 cups milk
  • 1 egg
  • 3 tablespoons melted butter
  • 1 teaspoon vanilla extract (optional)

Steps to Make Fluffy Pancakes

  1. Mix Dry Ingredients: In a large bowl, sift together the flour, baking powder, salt, and sugar.
  2. Combine Wet Ingredients: In a separate bowl, whisk together the milk, egg, melted butter, and vanilla extract if using.
  3. Create Batter: Gradually add the wet ingredients to the dry ingredients, mixing gently until combined. Do not overmix; a few lumps are okay.
  4. Heat the Pan: Heat a non-stick skillet or griddle over medium heat. Lightly grease with butter or cooking spray.
  5. Cook Pancakes: Pour 1/4 cup of batter onto the skillet for each pancake. Cook until bubbles form on the surface and the edges look set, about 2-3 minutes. Flip and cook for another 2 minutes until golden brown.
  6. Serve: Stack the pancakes on a plate and keep warm while you prepare the toppings.
Fluffy Pancakes

Lemon Curd as a Pancake Topping

To decorate your pancakes with lemon curd, check out our Lemon Curd Recipe for step-by-step instructions. Here’s how to use it:

  1. Warm up lemon curd slightly in the microwave or on the stovetop.
  2. Spread a generous layer of lemon curd between each pancake in the stack.
  3. Drizzle more lemon curd over the top of the stack for a glossy finish.
  4. Add fresh berries, a dollop of whipped cream, and a sprinkle of powdered sugar for a stunning presentation.
Fluffy Pancakes with lemon curd

Tips for Perfect Fluffy Pancakes

  • Use room-temperature ingredients for a smoother batter.
  • Do not press down on the pancakes while cooking; this ensures they stay fluffy.
  • Keep the cooked pancakes warm in a 200°F (93°C) oven while finishing the batch.

Variations and Pairings

  • Variations: Add chocolate chips or blueberries to the batter for a flavorful twist.
  • Pairings: Serve with maple syrup, honey, or fresh fruits like bananas and strawberries for a classic breakfast.
Fluffy Pancakes

FAQs

1. Can I make the batter ahead of time? Yes, you can refrigerate the batter for up to 24 hours. Stir gently before cooking.

2. Can I freeze pancakes? Yes, let them cool completely, then freeze in a single layer on a baking sheet. Transfer to a freezer bag and store for up to two months. Reheat in a toaster or oven.

3. What else can I use as toppings? Try butter, maple syrup, honey, whipped cream, or fresh fruit for delicious alternatives.

These fluffy pancakes are a classic breakfast delight, and adding lemon curd as a topping brings a tangy, creamy twist. Enjoy them your way for a perfect morning meal.

Lemon Curd Tart: A Decadent Citrus Dessert

Lemon curd tart is a classic dessert that combines a buttery, flaky crust with a tangy, creamy filling. This refreshing treat is perfect for any occasion, from casual gatherings to elegant dinners. With its vibrant flavor and stunning presentation, a lemon curd tart is sure to impress.

Why Make a Lemon Curd Tart?

  • Elegant Dessert: Ideal for special occasions or as a centerpiece dessert.
  • Citrus Flavor: The tangy lemon curd complements the rich crust beautifully.
  • Simple Ingredients: Uses pantry staples and fresh lemons.
Lemon Curd Tart

Ingredients for Lemon Curd Tart

For the Crust:

  • 1 1/4 cups all-purpose flour
  • 1/2 cup unsalted butter, cold and cubed
  • 1/4 cup granulated sugar
  • 1 large egg yolk
  • 2-3 tablespoons cold water

For the Filling:

  • 1 cup lemon curd (homemade or store-bought)

Steps to Make a Lemon Curd Tart

1. Prepare the Crust

  1. In a mixing bowl, combine the flour and sugar.
  2. Add the cold butter cubes and use a pastry cutter or your fingers to work the butter into the flour until the mixture resembles coarse crumbs.
  3. Mix in the egg yolk and enough cold water to form a dough. Knead lightly until it comes together.
  4. Flatten the dough into a disc, wrap it in plastic wrap, and refrigerate for at least 30 minutes.

For a detailed recipe and tips, visit our How to Make Lemon Curd article. Mastering this step will elevate your tart to perfection.

Lemon Curd Tart

2. Bake the Crust

  1. Preheat the oven to 350°F (175°C).
  2. Roll out the chilled dough on a floured surface to fit a 9-inch tart pan.
  3. Press the dough into the pan and trim the edges.
  4. Prick the bottom with a fork, line with parchment paper, and fill with pie weights or dried beans.
  5. Bake for 15 minutes. Remove the weights and bake for an additional 10 minutes until golden brown.
  6. Let the crust cool completely.

3. Add the Filling

  1. Pour the lemon curd into the cooled tart shell, spreading it evenly.
  2. Refrigerate the tart for at least 2 hours to set.
Lemon Curd Tart

4. Serve

  1. Garnish with fresh berries, whipped cream, or a dusting of powdered sugar for a decorative touch.
  2. Slice and serve chilled.
Lemon Curd Tart

Tips for the Best Lemon Curd Tart

  • Use homemade lemon curd for maximum flavor.
  • Chill the dough thoroughly to prevent shrinking during baking.
  • Ensure the tart shell is completely cool before adding the lemon curd.
  • Garnish just before serving to keep toppings fresh.
Lemon Curd Tart

Pairings and Variations

  • Pairings: Serve with a cup of tea or a glass of Prosecco for an elegant experience.
  • Variations: Add a layer of mascarpone cheese under the lemon curd for added richness. Try making mini tarts for individual servings.
Lemon Curd Tart

FAQs

1. Can I make the crust in advance? Yes, the crust can be made and baked up to two days ahead. Store it in an airtight container at room temperature.

2. How do I prevent my tart crust from becoming soggy? Ensure the crust is fully baked and cooled before adding the filling. Avoid overfilling with curd.

3. Can I freeze lemon curd tart? You can freeze the baked tart without garnish. Wrap it tightly and store for up to one month. Thaw in the refrigerator before serving.

4. What other fruits can I use to garnish? Fresh raspberries, blueberries, or edible flowers make excellent choices.

A lemon curd tart is a must-try dessert that balances sweet and tangy flavors with a satisfying crunch. Whether you’re hosting a dinner party or treating yourself, this tart delivers a burst of citrusy delight.

Lemon Curd: A Burst of Citrus Delight

Lemon curd is a silky, tangy spread loved by food enthusiasts around the world. Its vibrant flavor and creamy texture make it a versatile ingredient for various desserts and breakfast recipes. Whether you want to spread it on toast, fill a tart, or drizzle it over pancakes.

Why Lemon Curd?

  • Versatility: Perfect for pastries, cakes, or as a standalone treat.
  • Simple Ingredients: Uses everyday pantry items.
  • Homemade Taste: Fresher and more flavorful than store-bought options.

Ingredients

  • 4 large egg yolks
  • 3/4 cup granulated sugar
  • 1/2 cup fresh lemon juice (approximately 2-3 lemons)
  • 1 tablespoon lemon zest
  • 1/4 cup unsalted butter, cut into small cubes
Lemon Curd

Steps

  1. Whisk the egg yolks and sugar in a medium-sized saucepan until smooth.
  2. Add the lemon juice and zest. Mix until well combined.
  3. Cook the mixture over medium heat, stirring constantly with a silicone spatula. Continue until the mixture thickens and coats the back of the spatula. This takes about 8-10 minutes.
  4. Remove from heat and immediately stir in the butter cubes. Mix until fully melted and incorporated.
  5. Strain the curd through a fine mesh sieve to remove zest and any lumps.
  6. Transfer the curd to a clean jar or bowl. Let it cool to room temperature before covering and refrigerating. It will thicken further as it chills.
Lemon Curd

Lemon Curd Tart: A Perfect Dessert Idea

One of the best ways to use lemon curd is as a filling for a tart. The combination of a buttery crust and tangy lemon curd creates a dessert that is both refreshing and satisfying.

If you’re looking to create this delightful treat, check out our Lemon Curd Tart Recipe for detailed instructions. This recipe is a surefire way to impress your guests or indulge in a special dessert yourself.

Lemon Curd

Lemon Curd Pancakes: A Breakfast Delight

Another delicious way to enjoy lemon curd is by using it as a topping for pancakes. The creamy, tangy curd pairs perfectly with fluffy pancakes, adding a burst of citrus flavor to your morning meal.

For the step-by-step recipe, visit our Pancake Recipe to create a breakfast everyone will love.

Lemon Curd

Expert Tips for Achieving Perfect Results

  • Use fresh lemons for the best flavor. Bottled lemon juice alters the taste.
  • Stir continuously to avoid scrambling the eggs.
  • Store in an airtight container in the refrigerator for up to two weeks.

Creative Uses

  • Filling: Use it in tart shells or between cake layers.
  • Topping: Spoon over yogurt, pancakes, or waffles.
  • Swirl: Add to cheesecake or ice cream for a citrusy twist.
  • Gift Idea: Pour into small jars, tie with a ribbon, and share with friends.
Lemon Curd

FAQs

1. Can I freeze lemon curd? Yes. Store it in a freezer-safe container for up to three months. Thaw in the refrigerator before using.

2. Why did my lemon curd curdle? This happens if the heat is too high or if you stop stirring. Always cook on medium heat and stir constantly.

3. Can I make lemon curd without eggs? Yes. Use cornstarch as a thickener and substitute with vegan butter for a plant-based version.

4. How can I make my curd thicker? Cook it slightly longer. It thickens as it cools, so allow time for refrigeration.

5. What is the shelf life of lemon curd? When stored properly in an airtight container, it lasts up to two weeks in the refrigerator.

Chocolate Dirt Pie Cups: A Fun and Delicious Treat

Chocolate Dirt Pie Cups are a creative, easy-to-make dessert that combines rich chocolate flavor with playful presentation. Perfect for family gatherings, kids’ parties, or a fun weekend project, these cups are sure to impress. In this article, you’ll find a detailed recipe, tips for success, and answers to common questions about this delightful treat.

What Makes Chocolate Dirt Pie Cups Special?

  • Kid-Friendly Fun: The gummy worms and “dirt” layers make it exciting for children.
  • Quick Preparation: The recipe requires minimal effort and can be prepared ahead of time.
  • Customizable: You can adapt the recipe to suit dietary preferences or add extra flair.
Chocolate Dirt Pie Cups

Ingredients

To prepare 6 Chocolate Dirt Pie Cups, you will need:

  • 1 pack of chocolate sandwich cookies (e.g., Oreos)
  • 2 cups of cold milk
  • 1 pack (3.9 oz) of instant chocolate pudding mix
  • 1 cup of whipped topping (like Cool Whip)
  • Gummy worms (optional for decoration)
  • 6 clear plastic cups (medium-sized)

Optional Add-Ons

  • Chocolate chips or sprinkles for extra topping.
  • Crushed peanuts or caramel sauce for added flavor.

Step-by-Step Preparation

  1. Crush the Cookies
    • Place the cookies in a sealed plastic bag and crush them using a rolling pin until they become fine crumbs.
    • Reserve about 1/4 of the crumbs for the final topping.
  2. Prepare the Pudding
    • In a mixing bowl, whisk the instant pudding mix with cold milk for about 2 minutes.
    • Allow it to set for 5 minutes to thicken.
  3. Incorporate the Whipped Topping
    • Gently fold the whipped topping into the pudding mixture until it is smooth and creamy.
  4. Assemble the Layers
    • Start by adding a layer of cookie crumbs to the bottom of each cup.
    • Add a generous layer of pudding mixture on top of the crumbs.
    • Repeat the layers until the cups are almost full, finishing with a top layer of cookie crumbs.
  5. Decorate
    • Place gummy worms on top of each cup for a playful touch.
    • You can also add sprinkles, chocolate chips, or other toppings.
  6. Chill and Serve
    • Refrigerate the cups for at least 1 hour before serving to let the flavors meld and the pudding set.
Chocolate Dirt Pie Cups

Tips for Perfect Chocolate Dirt Pie Cups

  • Use high-quality chocolate cookies to enhance the flavor.
  • For a richer dessert, add a layer of melted chocolate or ganache between the cookie and pudding layers.
  • Experiment with different pudding flavors, such as vanilla or caramel.
  • If serving at a party, label the cups with fun names like “Wormy Treats” or “Mud Cups.”

Creative Variations

  • Healthy Twist: Use low-fat pudding and whipped topping. Substitute gummy worms with fresh fruit slices like strawberries or raspberries.
  • Themed Cups: Decorate according to holidays or events. Add orange sprinkles for Halloween or crushed peppermint for Christmas.
  • Gluten-Free Option: Use gluten-free chocolate cookies and pudding mix.
Chocolate Dirt Pie Cups

Frequently Asked Questions

1. Can I make these ahead of time?

Yes. Prepare the cups up to 24 hours in advance and store them in the refrigerator. Add the gummy worms just before serving to keep them fresh.

2. Can I substitute whipped topping with fresh cream?

Absolutely. Whip heavy cream with a little sugar until stiff peaks form, then use it as a substitute.

3. Are there other decorations I can use?

You can use edible flowers, chocolate shavings, or mini marshmallows for a unique presentation.

4. How long do they last in the refrigerator?

Chocolate Dirt Pie Cups can be stored in the fridge for up to 3 days. Cover them with plastic wrap to maintain freshness.

5. Can I make a larger batch?

Yes. Double or triple the recipe as needed. Ensure you have enough cups and space in your refrigerator.

Final Thoughts

Chocolate Dirt Pie Cups are a versatile and fun dessert that can be tailored to any occasion. Whether you’re looking to entertain kids or bring a whimsical touch to a gathering, this recipe delivers. Experiment with flavors and decorations to make these cups truly your own. Start preparing today and enjoy the delicious results!

Cinnamon Roll French Toast Rolls Recipe

If you’re a breakfast lover looking for a decadent treat that combines the warm, sugary goodness of cinnamon rolls with the golden perfection of French toast, this recipe is a must-try. In this article, we’ll show you how to make Cinnamon Roll French Toast Rolls—a dish that’s perfect for cozy mornings, brunch gatherings, or simply treating yourself. Plus, we’ll answer some common questions about this unique breakfast delight.

Why You’ll Love This Cinnamon Roll French Toast Rolls

Simple Ingredients: Most items are pantry staples.
Quick and Easy: Ready in under 30 minutes.
Crowd-Pleaser: Great for kids and adults alike.

Cinnamon Roll French Toast Rolls Recipe

Ingredients for Cinnamon Roll French Toast Rolls

To make these delicious Cinnamon Roll French Toast Rolls, gather the following:

  • 6 slices of soft bread (white or brioche works best)
  • 2 tablespoons of butter, melted
  • 4 tablespoons of cream cheese, softened
  • 2 tablespoons of powdered sugar
  • 1 teaspoon of vanilla extract
  • 1 teaspoon ground cinnamon
  • 2 eggs
  • ½ cup of milk
  • 1 tablespoon of granulated sugar
  • 1 teaspoon of vanilla extract (for egg mixture)
  • Powdered sugar (for dusting)
  • Maple syrup or cream cheese frosting (optional, for serving)
Cinnamon Roll French Toast Rolls Recipe

Step-by-Step Instructions To Cinnamon Roll French Toast Rolls

1. Prepare the Bread

Remove the crusts from the bread slices and flatten each slice with a rolling pin.

2. Make the Filling

In a small bowl, mix the cream cheese, powdered sugar, and 1 teaspoon of vanilla extract until smooth.

3. Assemble the Rolls

Spread a thin layer of the cream cheese mixture on each slice of bread. Sprinkle with a pinch of cinnamon.
Roll the bread slices tightly and set them aside.

4. Prepare the Egg Mixture

In another bowl, whisk together the eggs, milk, granulated sugar, and 1 teaspoon of vanilla extract.

5. Cook the Rolls

Heat a non-stick skillet over medium heat and brush with melted butter.
Dip each roll in the egg mixture, ensuring it’s evenly coated, and place it in the skillet seam-side down.
Cook until golden brown on all sides, about 2-3 minutes per side.

6. Garnish and Serve

Dust the rolls with powdered sugar and serve with a side of maple syrup or cream cheese frosting.

Pro Tips for Perfect Cinnamon Roll French Toast Rolls

Use fresh bread: Soft bread makes it easier to roll without cracking.
Don’t oversoak: Quickly dip the rolls in the egg mixture to prevent them from becoming soggy.
Add toppings: Fresh fruit, whipped cream, or chopped nuts can elevate this dish further.

Nutritional Information (Per Roll)

Calories: 150
Protein: 4g
Carbs: 18g
Fat: 7g

Cinnamon Roll French Toast Rolls Recipe

Frequently Asked Questions (FAQs)

1. Can I make this recipe ahead of time?

Yes! You can prepare the rolls the night before and store them in the fridge. Cook them fresh the next morning for the best taste.

2. Can I use whole wheat bread?

Absolutely! Whole wheat bread adds a bit of a hearty texture and makes this treat slightly healthier.

3. What other fillings can I use?

You can try Nutella, peanut butter, or fruit preserves for a fun twist on the classic recipe.

4. How do I store leftovers?

Place leftovers in an airtight container and refrigerate for up to 2 days. Reheat in a skillet or microwave before serving.

Make your mornings sweeter with these Cinnamon Roll French Toast Rolls. Whether you’re hosting a brunch or indulging in a weekend treat, this recipe will surely become a favorite. Try it out and let us know your experience in the comments below!

Grandma’s Peanut Butter Cookies Recipe: A Classic Delight

Peanut butter cookies are one of those timeless treats that bring back fond memories of childhood and family gatherings. Grandma’s peanut butter cookies are particularly special, offering a perfect balance of chewy and crunchy textures with a rich peanut flavor that’s hard to beat. If you’re looking to bake something that will make your home smell like love and nostalgia, this classic recipe is sure to become a family favorite.

In this article, we’ll walk you through Grandma’s Peanut Butter Cookies recipe, share some helpful baking tips, and answer frequently asked questions to ensure your cookies turn out perfectly every time.

Why This Peanut Butter Cookie Recipe is a Winner

What sets Grandma’s peanut butter cookies apart is their simplicity and authenticity. With just a handful of ingredients you likely already have in your pantry, you can create a batch of cookies that will remind you of simpler times. The addition of peanut butter gives these cookies a distinctive flavor that is irresistible.

This recipe is easy to follow, and whether you’re a seasoned baker or a beginner, you’ll find it straightforward and fun to prepare. Plus, the best part? You get to enjoy warm, freshly baked cookies right out of the oven!

Peanut Butter Cookies

Grandma’s Peanut Butter Cookies Recipe

Ingredients:

  • 1 cup peanut butter (smooth or chunky, depending on your preference)
  • 1 cup granulated sugar
  • 1 cup brown sugar (packed)
  • 2 large eggs
  • 1 tsp vanilla extract
  • 1 ½ cups all-purpose flour
  • 1 tsp baking soda
  • ½ tsp salt
  • 1/4 cup milk (optional for extra softness)
  • 1/4 cup unsalted butter, softened (optional for extra richness)
Peanut Butter Cookies

Instructions:

  1. Preheat the Oven: Start by preheating your oven to 350°F (175°C). Line two baking sheets with parchment paper for easy cookie removal.
  2. Mix the Wet Ingredients: In a large bowl, combine the peanut butter, granulated sugar, and brown sugar. Stir well until smooth. Add the eggs and vanilla extract, mixing until fully incorporated.
  3. Combine the Dry Ingredients: In a separate bowl, whisk together the flour, baking soda, and salt. Gradually add the dry ingredients into the wet ingredients, stirring until the dough comes together. If you prefer softer cookies, you can add a little milk and butter to the dough. This step is optional but recommended for a richer flavor.
  4. Form the Cookies: Using a tablespoon or cookie scoop, portion out the dough and roll it into balls. Place them on the prepared baking sheets, about 2 inches apart to allow space for spreading.
  5. Create the Signature Criss-Cross Pattern: Gently press down on each dough ball with a fork, creating a criss-cross pattern. This not only gives the cookies their signature look but also helps them bake evenly.
  6. Bake the Cookies: Bake the cookies in the preheated oven for 10–12 minutes or until they’re golden brown around the edges. Keep an eye on them toward the end of the baking time to avoid over-baking.
  7. Cool and Enjoy: Once baked, remove the cookies from the oven and let them cool on the baking sheets for 2 minutes before transferring them to a wire rack to cool completely.
Peanut Butter Cookies

Baking Tips for Perfect Peanut Butter Cookies

  • Peanut Butter Choice: For a chunkier texture, use chunky peanut butter. For a smooth, soft cookie, stick with smooth peanut butter. Both versions taste delicious!
  • Cookie Size: The size of your dough balls will determine how thick or thin the cookies are. For a more classic look, keep the balls about 1-inch in diameter.
  • Do Not Overbake: To ensure your cookies remain soft and chewy, remove them from the oven when they are slightly golden around the edges but still soft in the middle.
  • Storage Tips: Store your peanut butter cookies in an airtight container for up to a week. For longer freshness, you can freeze the cookies for up to 3 months.
Peanut Butter Cookies

Frequently Asked Questions (FAQs)

1. Can I use natural peanut butter for this recipe?
Yes, you can use natural peanut butter, but keep in mind that it may result in a slightly different texture. If the peanut butter is very oily, you may want to drain some of the excess oil before using it in your recipe.

2. Can I make these cookies gluten-free?
Absolutely! You can substitute the all-purpose flour with a gluten-free flour blend, which will yield similar results. Be sure to check the ingredients in your peanut butter to ensure it’s gluten-free.

3. How can I make the cookies softer or crunchier?
For a softer cookie, add a tablespoon or two of milk to the dough. To make the cookies crunchier, flatten them out more with the fork and bake a little longer, but be careful not to overdo it.

4. Can I add chocolate chips or other mix-ins?
Yes, adding chocolate chips, chopped peanuts, or even a swirl of caramel can elevate this classic recipe. If you want to experiment with different flavors, feel free to add in 1/2 to 1 cup of your favorite add-ins.

5. How long should I bake the cookies?
Bake the cookies for 10–12 minutes at 350°F (175°C). Keep an eye on them toward the end of the baking time, as ovens may vary. The cookies should be golden around the edges but soft in the center.

6. How can I prevent the cookies from spreading too much during baking?
If you want your cookies to hold their shape better, refrigerate the dough for at least 30 minutes before baking. This helps the dough firm up and prevents excessive spreading.

Conclusion

Grandma’s peanut butter cookies are a delicious and nostalgic treat that’s easy to make and sure to please everyone. Whether you’re baking them for a special occasion or just because, this recipe will give you the perfect balance of sweetness and peanut flavor. With a few simple ingredients and a little love, you’ll have homemade cookies that will bring smiles to your family and friends.

Now that you have the recipe and some baking tips, it’s time to get in the kitchen and enjoy the comforting aroma of freshly baked peanut butter cookies. Happy baking!

Easy 4-Ingredient Peanut Butter Balls (With Cream Cheese)

If you’re looking for a quick, no-bake treat that’s packed with creamy peanut butter goodness, look no further! These 4-Ingredient Peanut Butter Balls with Cream Cheese are the perfect indulgence. They’re simple to make, require minimal effort, and are ideal for satisfying your sweet tooth or impressing guests with a homemade dessert.

Why You’ll Love This Recipe

  • Quick and Easy: Ready in under 30 minutes with just four ingredients!
  • Versatile: Perfect for holiday parties, a midday snack, or a homemade gift.
  • No-Bake: Skip the oven and enjoy a fuss-free dessert.
Peanut Butter Balls

Ingredients for Peanut Butter Balls

This recipe calls for just four simple ingredients you likely already have in your kitchen:

  1. Cream Cheese (softened): 4 oz (half a standard block)
  2. Peanut Butter (smooth or crunchy): 1 cup
  3. Powdered Sugar: 2 cups
  4. Chocolate Chips or Candy Melts: 1 cup

How to Make 4-Ingredient Peanut Butter Balls

Follow these simple steps to create these delightful treats:

  1. Prepare the Cream Cheese Base: In a mixing bowl, beat the softened cream cheese until smooth. This ensures there are no lumps in your mixture.
  2. Add Peanut Butter: Mix in the peanut butter until well-combined. The texture should be creamy and thick.
  3. Incorporate the Sugar: Gradually add the powdered sugar, about half a cup at a time. Stir well until the mixture forms a dough-like consistency.
  4. Shape the Balls: Roll the dough into bite-sized balls, about 1 inch in diameter. Place them on a parchment-lined baking sheet.
  5. Chill the Balls: Refrigerate the balls for 20–30 minutes to firm them up. This makes coating them easier.
  6. Melt the Chocolate: While the balls chill, melt your chocolate chips or candy melts in the microwave or using a double boiler. Stir until smooth.
  7. Coat the Balls: Using a fork or toothpick, dip each ball into the melted chocolate, ensuring it’s fully coated. Place them back on the parchment-lined sheet.
  8. Set and Serve: Let the chocolate harden by leaving the balls at room temperature or refrigerating them. Once set, they’re ready to enjoy!
Peanut Butter Balls

Tips for the Best Peanut Butter Balls

  • Use Room-Temperature Cream Cheese: Softened cream cheese blends more easily and prevents lumps.
  • Add Toppings: Sprinkle crushed nuts, coconut flakes, or sprinkles on top before the chocolate hardens for extra flair.
  • Storage: Store these treats in an airtight container in the fridge for up to a week or freeze for longer shelf life.

Serving Suggestions

These peanut butter balls are incredibly versatile! Pair them with:

  • A cup of hot coffee or tea.
  • A scoop of vanilla ice cream for an indulgent dessert.
  • Decorative boxes or jars as a thoughtful homemade gift.
Peanut Butter Balls

FAQs About Peanut Butter Balls

1. Can I use natural peanut butter?
Yes, but make sure it’s well-stirred and not too oily. Natural peanut butter can sometimes make the mixture too soft.

2. Can I make these dairy-free?
Absolutely! Substitute cream cheese with a dairy-free alternative like vegan cream cheese.

3. What if my mixture is too sticky?
If your dough is too sticky to roll, add more powdered sugar a little at a time until the consistency improves.

4. Can I use white chocolate instead of dark chocolate?
Of course! White chocolate or even milk chocolate works beautifully for coating these treats.

5. How long do they last?
These peanut butter balls can be refrigerated for up to one week or frozen for 2–3 months.

Conclusion

These 4-Ingredient Peanut Butter Balls with Cream Cheese are a dream come true for dessert lovers. Whether you’re hosting a party, craving a sweet treat, or looking for an easy edible gift idea, this recipe is sure to be a hit. Give it a try and enjoy the rich, creamy flavor in every bite! Let us know how your batch turned out in the comments below, and don’t forget to share this recipe with your fellow foodies.