Cinnamon Sugar French Toast Muffins: A Perfect Treat

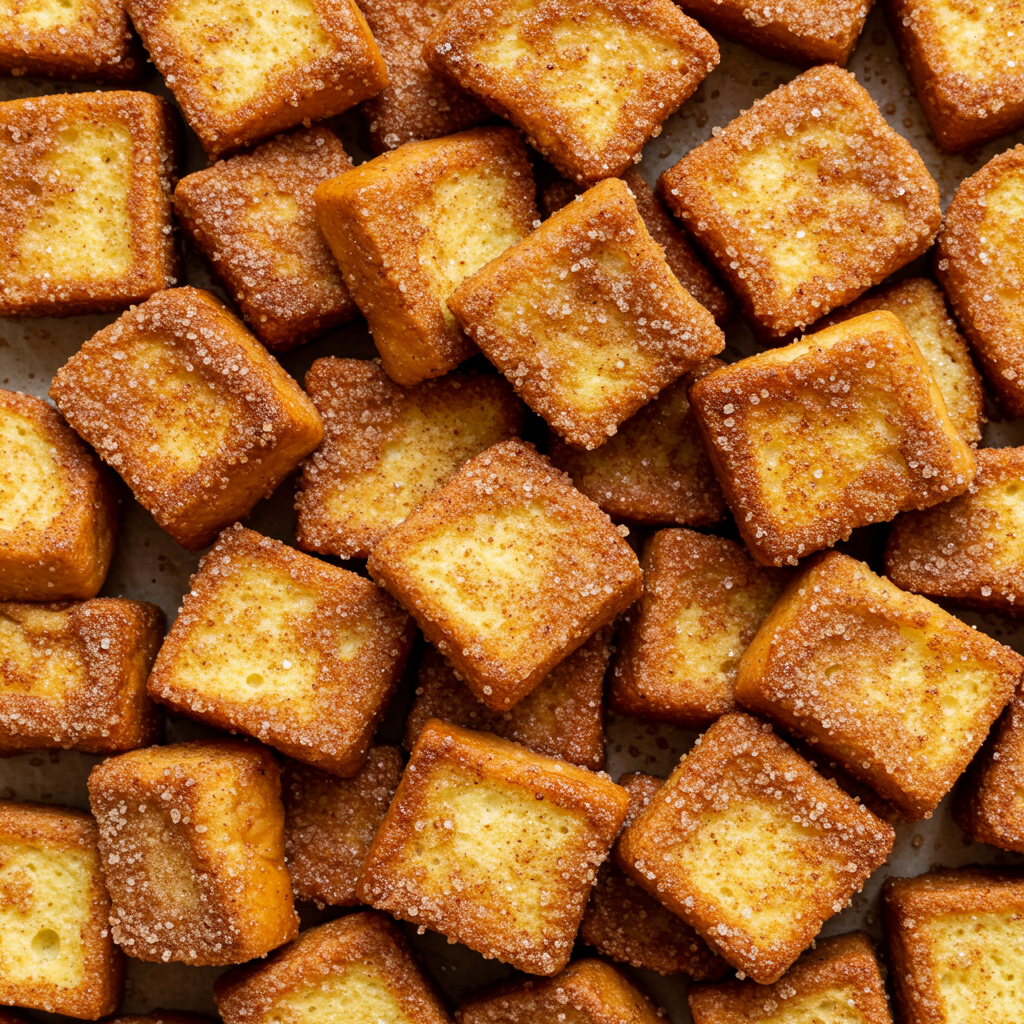
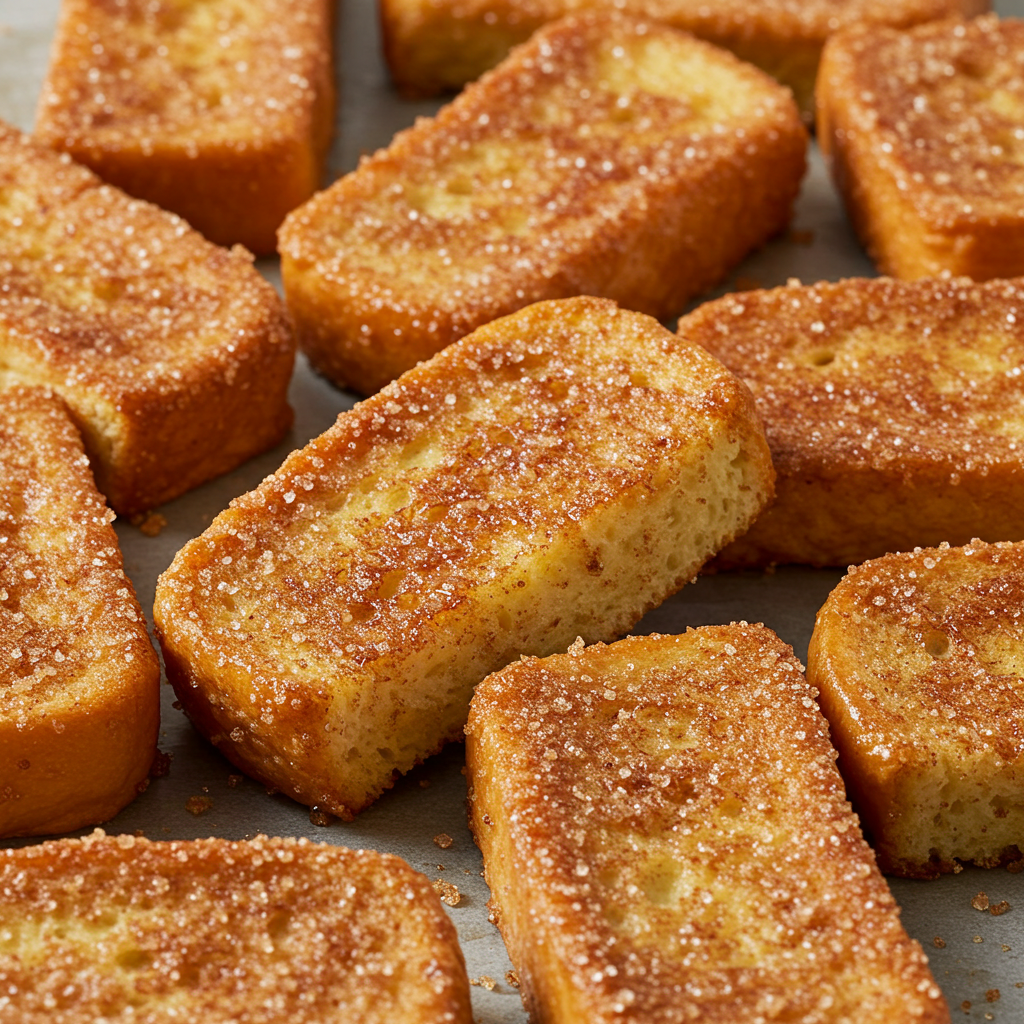
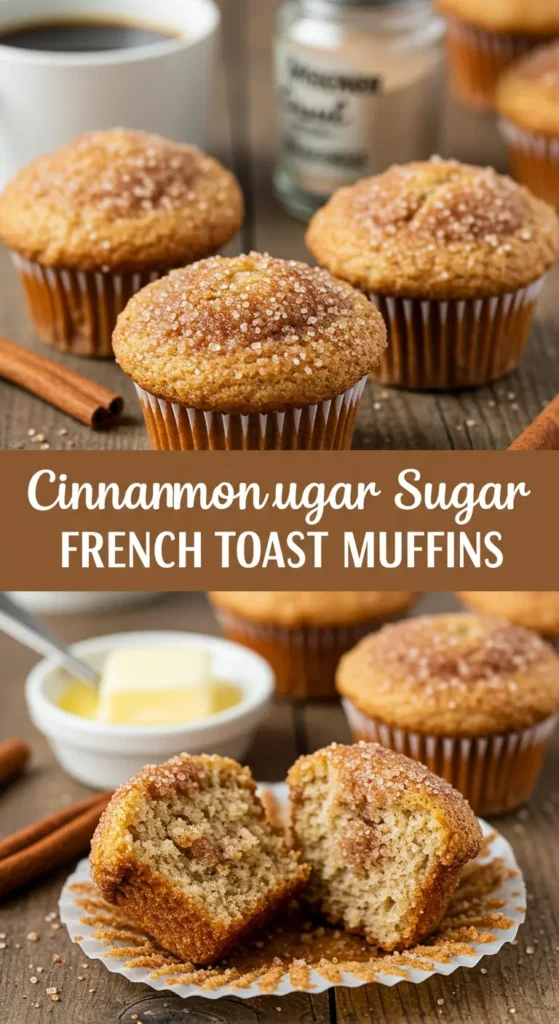
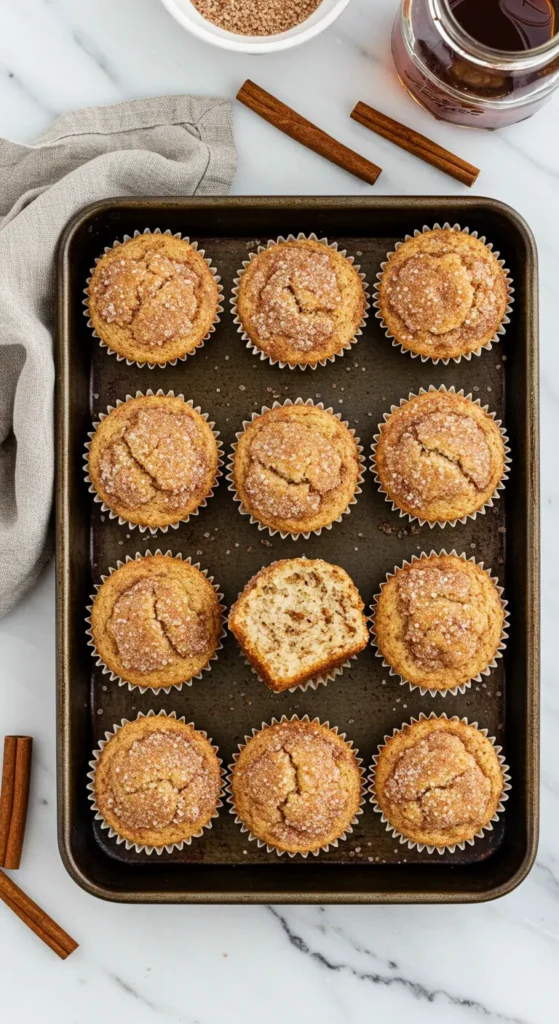
If you’re a fan of sweet, indulgent breakfasts or snacks, Cinnamon Sugar French Toast Muffins are for you. These muffins combine the classic flavors of French toast with the ease of a grab-and-go treat. Learn how to make these muffins at home with a simple recipe, and enjoy them fresh or stored for later.

Cinnamon Sugar French Toast Muffins

Ingredients for Cinnamon Sugar French Toast Muffins: A Perfect Treat

For the Muffins:

  • 6 slices of bread (preferably slightly stale)
  • 2 large eggs
  • 1 cup of milk (whole milk or a dairy-free alternative)
  • 1/4 cup of granulated sugar
  • 1 tsp vanilla extract
  • 1/2 tsp ground cinnamon

For the Topping:

  • 1/2 cup granulated sugar
  • 1 tsp ground cinnamon
  • 1/4 cup unsalted butter (melted)
Cinnamon Sugar French Toast Muffins

Instructions

Preparing the Cinnamon Sugar French Toast Muffins:

  1. Preheat your oven to 375°F (190°C) and grease a muffin tin.
  2. Cut the bread into small cubes (about 1-inch).
  3. In a large mixing bowl, whisk together eggs, milk, sugar, vanilla extract, and cinnamon.
  4. Add the bread cubes to the mixture and stir gently. Let it sit for 5 minutes to soak up the liquid.
  5. Spoon the mixture evenly into the muffin tin, pressing it down slightly to compact.
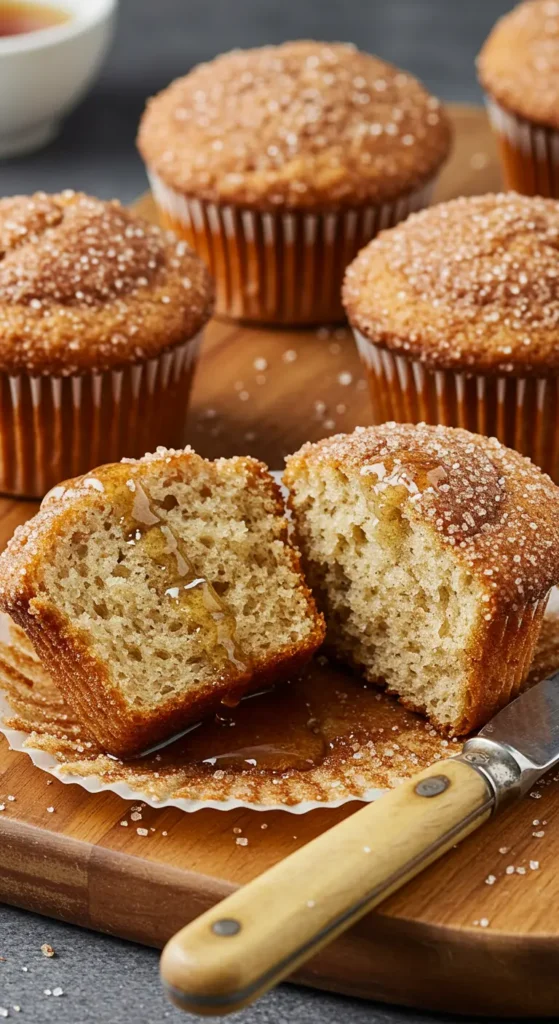
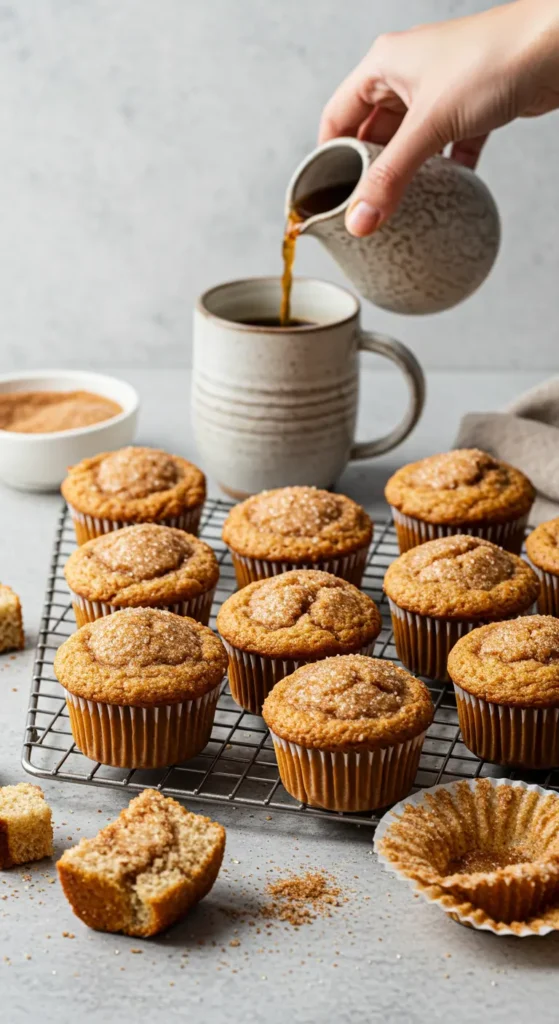
  6. Bake for 20-25 minutes, or until the tops are golden brown and set.

Adding the Topping:

  1. While the muffins bake, mix the sugar and cinnamon for the topping in a shallow bowl.
  2. Once muffins are baked and slightly cooled, brush the tops with melted butter.
  3. Roll the muffins in the cinnamon sugar mixture until fully coated.

Tips for Perfect Cinnamon Sugar French Toast Muffins

  • Use day-old or slightly stale bread for the best texture.
  • Adjust the sugar level in the topping to suit your taste.
  • Serve warm for a freshly baked feel, or reheat briefly before serving.
  • Pair with maple syrup, whipped cream, or fresh fruit for extra flavor.

Why You’ll Love This Recipe

  • Quick and easy to make.
  • Perfect for breakfast, brunch, or a dessert.
  • Freezer-friendly: Store leftovers in an airtight container and reheat when needed.
Cinnamon Sugar French Toast Muffins

FAQs

Can I use a different type of bread? Yes. Brioche, challah, or white sandwich bread works best.

Can these muffins be made ahead of time? Yes. Prepare and bake the muffins, then store them in an airtight container. Add the topping just before serving for freshness.

Can I make this recipe dairy-free? Yes. Use almond milk, oat milk, or another dairy-free alternative. Replace butter with coconut oil or a dairy-free butter substitute.

How do I store leftovers? Keep in an airtight container at room temperature for up to 2 days or in the refrigerator for up to 5 days.

Can I freeze these muffins? Yes. Freeze without the topping for up to 3 months. Reheat and add the cinnamon sugar topping before serving.

Try these Cinnamon Sugar French Toast Muffins for your next gathering or as a weekend treat. They’re easy, versatile, and guaranteed to please any crowd.

Caesar Salad : How to Make the Perfect Classic Dish

Caesar salad is a classic dish that has stood the test of time. It’s perfect for lunch, dinner, or as a side. This recipe is easy to follow and guarantees great results every time. With its creamy dressing, crunchy croutons, and fresh lettuce, it offers a delightful mix of textures and flavors that everyone will enjoy. Whether you’re a seasoned cook or a kitchen novice, this recipe is an excellent choice.

Caesar Salad Recipe

Ingredients for Caesar Salad

  • 1 large romaine lettuce
  • 1/4 cup grated Parmesan cheese
  • 1/2 cup croutons
  • 1/4 cup Caesar dressing (store-bought or homemade)

Optional:

  • Grilled chicken, shrimp, or tofu for added protein
  • Freshly ground black pepper
  • A squeeze of fresh lemon juice

How to Prepare Caesar Salad

  1. Prepare the Lettuce: Wash and dry the lettuce thoroughly. Tear it into bite-sized pieces. Properly dried lettuce ensures the dressing adheres well.
  2. Add the Dressing: Place the lettuce in a large bowl. Drizzle Caesar dressing over it. Toss gently to coat. Start with a small amount and add more as needed to avoid over-dressing.
  3. Incorporate Cheese: Sprinkle Parmesan cheese evenly over the salad. For a richer taste, use shavings instead of grated cheese.
  4. Top with Croutons: Add croutons for crunch. Use seasoned croutons for added flavor.
  5. Add Protein (Optional): Include grilled chicken, shrimp, or tofu for a hearty meal. Marinate the protein with garlic, lemon, and herbs before grilling for extra flavor.
  6. Add Final Touches: Sprinkle freshly ground black pepper and a squeeze of fresh lemon juice for a bright, tangy finish.
  7. Serve Immediately: Freshness is key. Serve right after mixing to retain crispness.
Caesar Salad Recipe

Tips for the Best Caesar Salad

  • Use fresh romaine lettuce for maximum crunch. Avoid iceberg lettuce as it lacks the characteristic flavor.
  • Make your own croutons by toasting cubes of bread with olive oil, garlic, and herbs. Use sourdough or French bread for the best texture.
  • Homemade dressing elevates the flavor. Blend olive oil, egg yolks, lemon juice, Dijon mustard, anchovies, and garlic for a classic Caesar dressing. Adjust the seasoning to your taste.
  • Grate Parmesan fresh for the best taste. Pre-grated cheese can lack the robust flavor of freshly grated cheese.
  • For a lighter version, use Greek yogurt instead of mayonnaise in the dressing.
Caesar Salad Recipe

Nutritional Benefits

Caesar salad can be tailored to your dietary needs. The base of romaine lettuce provides vitamins A and K, while the Parmesan cheese adds calcium. Including grilled chicken or shrimp boosts protein levels, making it a complete meal. Opting for a homemade dressing allows you to control the fat and sodium content.

FAQs

1. Can I make Caesar salad ahead of time? You can prepare the ingredients in advance but combine them just before serving to keep the lettuce crisp.

2. What is the best substitute for anchovies in the dressing? You can use Worcestershire sauce or capers for a similar umami flavor.

3. Is Caesar salad healthy? It can be healthy if you control the dressing quantity and use fresh, nutrient-rich ingredients. Adding lean protein boosts its nutritional value.

4. How can I make it vegetarian? Use vegetarian-friendly Parmesan and skip the anchovies in the dressing. You can also add roasted chickpeas for protein.

5. Can I store leftovers? Leftovers don’t store well because the lettuce wilts quickly. It’s best to eat the salad fresh. However, you can store the dressing separately for later use.

6. Can I use kale instead of romaine? Yes, kale can be a good substitute. Massage the kale leaves with olive oil to soften them before adding the dressing.

This recipe is a crowd-pleaser. Whether for a simple meal or a special gathering, Caesar salad delivers flavor and satisfaction. Experiment with variations and enjoy this timeless dish.

Chocolate Dirt Pie Cups: A Fun and Delicious Treat

Chocolate Dirt Pie Cups are a creative, easy-to-make dessert that combines rich chocolate flavor with playful presentation. Perfect for family gatherings, kids’ parties, or a fun weekend project, these cups are sure to impress. In this article, you’ll find a detailed recipe, tips for success, and answers to common questions about this delightful treat.

What Makes Chocolate Dirt Pie Cups Special?

  • Kid-Friendly Fun: The gummy worms and “dirt” layers make it exciting for children.
  • Quick Preparation: The recipe requires minimal effort and can be prepared ahead of time.
  • Customizable: You can adapt the recipe to suit dietary preferences or add extra flair.
Chocolate Dirt Pie Cups

Ingredients

To prepare 6 Chocolate Dirt Pie Cups, you will need:

  • 1 pack of chocolate sandwich cookies (e.g., Oreos)
  • 2 cups of cold milk
  • 1 pack (3.9 oz) of instant chocolate pudding mix
  • 1 cup of whipped topping (like Cool Whip)
  • Gummy worms (optional for decoration)
  • 6 clear plastic cups (medium-sized)

Optional Add-Ons

  • Chocolate chips or sprinkles for extra topping.
  • Crushed peanuts or caramel sauce for added flavor.

Step-by-Step Preparation

  1. Crush the Cookies
    • Place the cookies in a sealed plastic bag and crush them using a rolling pin until they become fine crumbs.
    • Reserve about 1/4 of the crumbs for the final topping.
  2. Prepare the Pudding
    • In a mixing bowl, whisk the instant pudding mix with cold milk for about 2 minutes.
    • Allow it to set for 5 minutes to thicken.
  3. Incorporate the Whipped Topping
    • Gently fold the whipped topping into the pudding mixture until it is smooth and creamy.
  4. Assemble the Layers
    • Start by adding a layer of cookie crumbs to the bottom of each cup.
    • Add a generous layer of pudding mixture on top of the crumbs.
    • Repeat the layers until the cups are almost full, finishing with a top layer of cookie crumbs.
  5. Decorate
    • Place gummy worms on top of each cup for a playful touch.
    • You can also add sprinkles, chocolate chips, or other toppings.
  6. Chill and Serve
    • Refrigerate the cups for at least 1 hour before serving to let the flavors meld and the pudding set.
Chocolate Dirt Pie Cups

Tips for Perfect Chocolate Dirt Pie Cups

  • Use high-quality chocolate cookies to enhance the flavor.
  • For a richer dessert, add a layer of melted chocolate or ganache between the cookie and pudding layers.
  • Experiment with different pudding flavors, such as vanilla or caramel.
  • If serving at a party, label the cups with fun names like “Wormy Treats” or “Mud Cups.”

Creative Variations

  • Healthy Twist: Use low-fat pudding and whipped topping. Substitute gummy worms with fresh fruit slices like strawberries or raspberries.
  • Themed Cups: Decorate according to holidays or events. Add orange sprinkles for Halloween or crushed peppermint for Christmas.
  • Gluten-Free Option: Use gluten-free chocolate cookies and pudding mix.
Chocolate Dirt Pie Cups

Frequently Asked Questions

1. Can I make these ahead of time?

Yes. Prepare the cups up to 24 hours in advance and store them in the refrigerator. Add the gummy worms just before serving to keep them fresh.

2. Can I substitute whipped topping with fresh cream?

Absolutely. Whip heavy cream with a little sugar until stiff peaks form, then use it as a substitute.

3. Are there other decorations I can use?

You can use edible flowers, chocolate shavings, or mini marshmallows for a unique presentation.

4. How long do they last in the refrigerator?

Chocolate Dirt Pie Cups can be stored in the fridge for up to 3 days. Cover them with plastic wrap to maintain freshness.

5. Can I make a larger batch?

Yes. Double or triple the recipe as needed. Ensure you have enough cups and space in your refrigerator.

Final Thoughts

Chocolate Dirt Pie Cups are a versatile and fun dessert that can be tailored to any occasion. Whether you’re looking to entertain kids or bring a whimsical touch to a gathering, this recipe delivers. Experiment with flavors and decorations to make these cups truly your own. Start preparing today and enjoy the delicious results!

Cheeseburger Wraps Recipe – Simple & Tasty

Cheeseburger wraps offer a modern twist on a classic favorite. They are portable, versatile, and easy to make at home. Perfect for a quick lunch, dinner, or even meal prep, these wraps pack the juicy flavors of a cheeseburger into a convenient tortilla. Here is a detailed recipe for creating your own cheeseburger wraps.

Ingredients for Cheeseburger Wraps Recipe

  • 1 pound ground beef (85% lean preferred)
  • 1 tablespoon olive oil
  • 1 teaspoon garlic powder
  • 1 teaspoon onion powder
  • Salt and pepper to taste
  • 4 large flour tortillas
  • 1 cup shredded cheddar cheese
  • 1/2 cup mayonnaise
  • 2 tablespoons ketchup
  • 1 tablespoon mustard
  • 1/2 cup dill pickles, diced
  • 1 cup shredded lettuce
  • 1 tomato, diced
Cheeseburger Wraps Recipe

Instructions

  1. Cook the Beef:
    • Heat olive oil in a skillet over medium heat.
    • Add ground beef and cook until browned. Break up the meat with a spoon as it cooks.
    • Season with garlic powder, onion powder, salt, and pepper. Stir well.
  2. Prepare the Sauce:
    • In a small bowl, mix mayonnaise, ketchup, and mustard. Set aside.
  3. Assemble the Wraps:
    • Lay a tortilla flat on a clean surface.
    • Spread a layer of the sauce over the tortilla.
    • Add a generous portion of the cooked beef.
    • Sprinkle shredded cheese over the beef.
    • Top with pickles, shredded lettuce, and diced tomato.
  4. Wrap and Heat:
    • Fold the sides of the tortilla inward, then roll it tightly into a wrap.
    • Heat a skillet or griddle over medium heat.
    • Place the wraps seam-side down on the skillet and cook for 2-3 minutes on each side until golden brown and crispy.
  5. Serve:
    • Slice each wrap in half and serve warm.
    • Pair with fries, a side salad, or your favorite dipping sauce.

Tips for Perfect Cheeseburger Wraps

  • Use a large tortilla to ensure all the fillings fit without tearing.
  • Toasting the wraps enhances flavor and adds a satisfying crunch.
  • Customize the ingredients. Add bacon, caramelized onions, or jalapeños for variety.
  • These wraps store well. Wrap them in foil and refrigerate for up to two days. Reheat in a skillet for the best texture.
Cheeseburger Wraps Recipe

Nutritional Information (Per Serving)

  • Calories: 420
  • Protein: 24g
  • Carbohydrates: 29g
  • Fat: 24g
  • Fiber: 2g
Cheeseburger Wraps Recipe

FAQs

Can I use a different type of meat? Yes, you can substitute ground beef with ground turkey, chicken, or plant-based meat.

Are there gluten-free options? Use gluten-free tortillas to make this recipe suitable for a gluten-free diet.

How do I make this wrap healthier? Use whole-grain tortillas, leaner meat, and low-fat cheese. Swap mayo for Greek yogurt in the sauce.

Can I make these ahead of time? Yes, prepare the wraps and store them in the refrigerator. Toast them in a skillet before serving to restore crispiness.

What side dishes pair well with cheeseburger wraps? Fries, sweet potato wedges, coleslaw, or a fresh green salad complement these wraps perfectly.

Enjoy this easy, flavorful recipe and create your perfect cheeseburger wrap at home!

Cinnamon Roll French Toast Rolls Recipe

If you’re a breakfast lover looking for a decadent treat that combines the warm, sugary goodness of cinnamon rolls with the golden perfection of French toast, this recipe is a must-try. In this article, we’ll show you how to make Cinnamon Roll French Toast Rolls—a dish that’s perfect for cozy mornings, brunch gatherings, or simply treating yourself. Plus, we’ll answer some common questions about this unique breakfast delight.

Why You’ll Love This Cinnamon Roll French Toast Rolls

Simple Ingredients: Most items are pantry staples.
Quick and Easy: Ready in under 30 minutes.
Crowd-Pleaser: Great for kids and adults alike.

Cinnamon Roll French Toast Rolls Recipe

Ingredients for Cinnamon Roll French Toast Rolls

To make these delicious Cinnamon Roll French Toast Rolls, gather the following:

  • 6 slices of soft bread (white or brioche works best)
  • 2 tablespoons of butter, melted
  • 4 tablespoons of cream cheese, softened
  • 2 tablespoons of powdered sugar
  • 1 teaspoon of vanilla extract
  • 1 teaspoon ground cinnamon
  • 2 eggs
  • ½ cup of milk
  • 1 tablespoon of granulated sugar
  • 1 teaspoon of vanilla extract (for egg mixture)
  • Powdered sugar (for dusting)
  • Maple syrup or cream cheese frosting (optional, for serving)
Cinnamon Roll French Toast Rolls Recipe

Step-by-Step Instructions To Cinnamon Roll French Toast Rolls

1. Prepare the Bread

Remove the crusts from the bread slices and flatten each slice with a rolling pin.

2. Make the Filling

In a small bowl, mix the cream cheese, powdered sugar, and 1 teaspoon of vanilla extract until smooth.

3. Assemble the Rolls

Spread a thin layer of the cream cheese mixture on each slice of bread. Sprinkle with a pinch of cinnamon.
Roll the bread slices tightly and set them aside.

4. Prepare the Egg Mixture

In another bowl, whisk together the eggs, milk, granulated sugar, and 1 teaspoon of vanilla extract.

5. Cook the Rolls

Heat a non-stick skillet over medium heat and brush with melted butter.
Dip each roll in the egg mixture, ensuring it’s evenly coated, and place it in the skillet seam-side down.
Cook until golden brown on all sides, about 2-3 minutes per side.

6. Garnish and Serve

Dust the rolls with powdered sugar and serve with a side of maple syrup or cream cheese frosting.

Pro Tips for Perfect Cinnamon Roll French Toast Rolls

Use fresh bread: Soft bread makes it easier to roll without cracking.
Don’t oversoak: Quickly dip the rolls in the egg mixture to prevent them from becoming soggy.
Add toppings: Fresh fruit, whipped cream, or chopped nuts can elevate this dish further.

Nutritional Information (Per Roll)

Calories: 150
Protein: 4g
Carbs: 18g
Fat: 7g

Cinnamon Roll French Toast Rolls Recipe

Frequently Asked Questions (FAQs)

1. Can I make this recipe ahead of time?

Yes! You can prepare the rolls the night before and store them in the fridge. Cook them fresh the next morning for the best taste.

2. Can I use whole wheat bread?

Absolutely! Whole wheat bread adds a bit of a hearty texture and makes this treat slightly healthier.

3. What other fillings can I use?

You can try Nutella, peanut butter, or fruit preserves for a fun twist on the classic recipe.

4. How do I store leftovers?

Place leftovers in an airtight container and refrigerate for up to 2 days. Reheat in a skillet or microwave before serving.

Make your mornings sweeter with these Cinnamon Roll French Toast Rolls. Whether you’re hosting a brunch or indulging in a weekend treat, this recipe will surely become a favorite. Try it out and let us know your experience in the comments below!

Grandma’s Peanut Butter Cookies Recipe: A Classic Delight

Peanut butter cookies are one of those timeless treats that bring back fond memories of childhood and family gatherings. Grandma’s peanut butter cookies are particularly special, offering a perfect balance of chewy and crunchy textures with a rich peanut flavor that’s hard to beat. If you’re looking to bake something that will make your home smell like love and nostalgia, this classic recipe is sure to become a family favorite.

In this article, we’ll walk you through Grandma’s Peanut Butter Cookies recipe, share some helpful baking tips, and answer frequently asked questions to ensure your cookies turn out perfectly every time.

Why This Peanut Butter Cookie Recipe is a Winner

What sets Grandma’s peanut butter cookies apart is their simplicity and authenticity. With just a handful of ingredients you likely already have in your pantry, you can create a batch of cookies that will remind you of simpler times. The addition of peanut butter gives these cookies a distinctive flavor that is irresistible.

This recipe is easy to follow, and whether you’re a seasoned baker or a beginner, you’ll find it straightforward and fun to prepare. Plus, the best part? You get to enjoy warm, freshly baked cookies right out of the oven!

Peanut Butter Cookies

Grandma’s Peanut Butter Cookies Recipe

Ingredients:

  • 1 cup peanut butter (smooth or chunky, depending on your preference)
  • 1 cup granulated sugar
  • 1 cup brown sugar (packed)
  • 2 large eggs
  • 1 tsp vanilla extract
  • 1 ½ cups all-purpose flour
  • 1 tsp baking soda
  • ½ tsp salt
  • 1/4 cup milk (optional for extra softness)
  • 1/4 cup unsalted butter, softened (optional for extra richness)
Peanut Butter Cookies

Instructions:

  1. Preheat the Oven: Start by preheating your oven to 350°F (175°C). Line two baking sheets with parchment paper for easy cookie removal.
  2. Mix the Wet Ingredients: In a large bowl, combine the peanut butter, granulated sugar, and brown sugar. Stir well until smooth. Add the eggs and vanilla extract, mixing until fully incorporated.
  3. Combine the Dry Ingredients: In a separate bowl, whisk together the flour, baking soda, and salt. Gradually add the dry ingredients into the wet ingredients, stirring until the dough comes together. If you prefer softer cookies, you can add a little milk and butter to the dough. This step is optional but recommended for a richer flavor.
  4. Form the Cookies: Using a tablespoon or cookie scoop, portion out the dough and roll it into balls. Place them on the prepared baking sheets, about 2 inches apart to allow space for spreading.
  5. Create the Signature Criss-Cross Pattern: Gently press down on each dough ball with a fork, creating a criss-cross pattern. This not only gives the cookies their signature look but also helps them bake evenly.
  6. Bake the Cookies: Bake the cookies in the preheated oven for 10–12 minutes or until they’re golden brown around the edges. Keep an eye on them toward the end of the baking time to avoid over-baking.
  7. Cool and Enjoy: Once baked, remove the cookies from the oven and let them cool on the baking sheets for 2 minutes before transferring them to a wire rack to cool completely.
Peanut Butter Cookies

Baking Tips for Perfect Peanut Butter Cookies

  • Peanut Butter Choice: For a chunkier texture, use chunky peanut butter. For a smooth, soft cookie, stick with smooth peanut butter. Both versions taste delicious!
  • Cookie Size: The size of your dough balls will determine how thick or thin the cookies are. For a more classic look, keep the balls about 1-inch in diameter.
  • Do Not Overbake: To ensure your cookies remain soft and chewy, remove them from the oven when they are slightly golden around the edges but still soft in the middle.
  • Storage Tips: Store your peanut butter cookies in an airtight container for up to a week. For longer freshness, you can freeze the cookies for up to 3 months.
Peanut Butter Cookies

Frequently Asked Questions (FAQs)

1. Can I use natural peanut butter for this recipe?
Yes, you can use natural peanut butter, but keep in mind that it may result in a slightly different texture. If the peanut butter is very oily, you may want to drain some of the excess oil before using it in your recipe.

2. Can I make these cookies gluten-free?
Absolutely! You can substitute the all-purpose flour with a gluten-free flour blend, which will yield similar results. Be sure to check the ingredients in your peanut butter to ensure it’s gluten-free.

3. How can I make the cookies softer or crunchier?
For a softer cookie, add a tablespoon or two of milk to the dough. To make the cookies crunchier, flatten them out more with the fork and bake a little longer, but be careful not to overdo it.

4. Can I add chocolate chips or other mix-ins?
Yes, adding chocolate chips, chopped peanuts, or even a swirl of caramel can elevate this classic recipe. If you want to experiment with different flavors, feel free to add in 1/2 to 1 cup of your favorite add-ins.

5. How long should I bake the cookies?
Bake the cookies for 10–12 minutes at 350°F (175°C). Keep an eye on them toward the end of the baking time, as ovens may vary. The cookies should be golden around the edges but soft in the center.

6. How can I prevent the cookies from spreading too much during baking?
If you want your cookies to hold their shape better, refrigerate the dough for at least 30 minutes before baking. This helps the dough firm up and prevents excessive spreading.

Conclusion

Grandma’s peanut butter cookies are a delicious and nostalgic treat that’s easy to make and sure to please everyone. Whether you’re baking them for a special occasion or just because, this recipe will give you the perfect balance of sweetness and peanut flavor. With a few simple ingredients and a little love, you’ll have homemade cookies that will bring smiles to your family and friends.

Now that you have the recipe and some baking tips, it’s time to get in the kitchen and enjoy the comforting aroma of freshly baked peanut butter cookies. Happy baking!

Potatoes Au Gratin: A Creamy and Cheesy Delight

Potatoes au gratin is a classic comfort food loved for its rich, creamy texture and irresistible golden cheese topping. Perfect as a side dish for family meals or festive gatherings, this French-inspired recipe is both elegant and satisfying. In this article, you’ll find a step-by-step recipe, expert tips, and answers to common questions about potatoes au gratin.

What Is Potatoes Au Gratin?

Potatoes au gratin is a layered dish made with thinly sliced potatoes, creamy sauce, and cheese baked to perfection. Its origins lie in French cuisine, where “au gratin” refers to the crispy, browned topping achieved through baking. This dish is versatile and pairs wonderfully with meats, seafood, or vegetarian mains.

Potatoes Au Gratin

Potatoes Au Gratin Recipe

Ingredients

To serve 6 people, you’ll need:

  • 2 pounds of russet or Yukon Gold potatoes (peeled and thinly sliced)
  • 2 cups heavy cream
  • 1 cup whole milk
  • 2 garlic cloves (minced)
  • 2 cups shredded Gruyère cheese (or a blend of Gruyère and Parmesan)
  • 2 tablespoons unsalted butter
  • Salt and freshly ground black pepper
  • Optional: Fresh thyme or parsley for garnish
Potatoes Au Gratin

Step-by-Step Instructions

1. Preheat the Oven
Set your oven to 375°F (190°C). Grease a baking dish with butter to prevent sticking.

2. Prepare the Potatoes
Peel and thinly slice the potatoes evenly. Use a mandoline for precision, ensuring even cooking.

3. Make the Creamy Sauce
In a medium saucepan, heat heavy cream, milk, minced garlic, salt, and pepper over medium heat. Stir until warm, but do not let it boil.

4. Layer the Potatoes and Sauce
Arrange one-third of the potato slices in an overlapping pattern in the greased baking dish. Pour a portion of the cream mixture over the layer and sprinkle with shredded cheese. Repeat this process two more times, finishing with a generous cheese topping.

5. Bake the Dish
Cover the dish with aluminum foil and bake for 45 minutes. Remove the foil and bake for another 20–30 minutes, or until the top is golden and the potatoes are tender when pierced with a fork.

6. Rest and Serve
Let the dish cool for 5–10 minutes before serving. Garnish with fresh thyme or parsley for added flavor and visual appeal.

Tips for Making Perfect Potatoes Au Gratin

1. Choose the Right Potatoes

Russet potatoes are ideal for their starchiness, which creates a creamy texture. Yukon Gold potatoes add a naturally buttery flavor.

2. Use High-Quality Cheese

Gruyère cheese is traditional, but you can experiment with other options like cheddar, fontina, or a mix. High-quality cheese ensures a rich and flavorful dish.

3. Slice Potatoes Evenly

Uniform slices cook more evenly. A mandoline slicer is a helpful tool for achieving this.

4. Avoid Oxidation

Slice the potatoes just before assembling the dish to prevent them from browning. If necessary, submerge sliced potatoes in cold water, then pat dry before use.

Potatoes Au Gratin

FAQs About Potatoes Au Gratin

1. Can I Make Potatoes Au Gratin Ahead of Time?

Yes, you can assemble the dish up to 24 hours in advance and refrigerate it. When ready to serve, bake it fresh for the best results.

2. What’s the Difference Between Scalloped Potatoes and Potatoes Au Gratin?

Scalloped potatoes are made with a creamy sauce but typically without cheese, while potatoes au gratin include cheese for added richness and flavor.

3. Can I Substitute Dairy Ingredients?

You can use non-dairy cream alternatives for a lighter version, but the taste and texture may differ slightly. For a healthier option, substitute half-and-half for heavy cream.

4. How Should I Store Leftovers?

Store leftovers in an airtight container in the refrigerator for up to 3 days. Reheat in the oven at 350°F (175°C) to restore the creamy texture and crispy topping.

5. Can I Add Other Ingredients?

Absolutely! Add cooked bacon, caramelized onions, or fresh herbs for extra layers of flavor.

Potatoes au gratin is a versatile dish that elevates any meal. Its creamy layers and cheesy topping make it a crowd-pleaser, whether served during the holidays or a casual dinner. Follow this recipe, use the provided tips, and get ready to impress your family and guests with this delicious dish. For more recipes and culinary inspiration, stay tuned to our blog!

Easy 4-Ingredient Peanut Butter Balls (With Cream Cheese)

If you’re looking for a quick, no-bake treat that’s packed with creamy peanut butter goodness, look no further! These 4-Ingredient Peanut Butter Balls with Cream Cheese are the perfect indulgence. They’re simple to make, require minimal effort, and are ideal for satisfying your sweet tooth or impressing guests with a homemade dessert.

Why You’ll Love This Recipe

  • Quick and Easy: Ready in under 30 minutes with just four ingredients!
  • Versatile: Perfect for holiday parties, a midday snack, or a homemade gift.
  • No-Bake: Skip the oven and enjoy a fuss-free dessert.
Peanut Butter Balls

Ingredients for Peanut Butter Balls

This recipe calls for just four simple ingredients you likely already have in your kitchen:

  1. Cream Cheese (softened): 4 oz (half a standard block)
  2. Peanut Butter (smooth or crunchy): 1 cup
  3. Powdered Sugar: 2 cups
  4. Chocolate Chips or Candy Melts: 1 cup

How to Make 4-Ingredient Peanut Butter Balls

Follow these simple steps to create these delightful treats:

  1. Prepare the Cream Cheese Base: In a mixing bowl, beat the softened cream cheese until smooth. This ensures there are no lumps in your mixture.
  2. Add Peanut Butter: Mix in the peanut butter until well-combined. The texture should be creamy and thick.
  3. Incorporate the Sugar: Gradually add the powdered sugar, about half a cup at a time. Stir well until the mixture forms a dough-like consistency.
  4. Shape the Balls: Roll the dough into bite-sized balls, about 1 inch in diameter. Place them on a parchment-lined baking sheet.
  5. Chill the Balls: Refrigerate the balls for 20–30 minutes to firm them up. This makes coating them easier.
  6. Melt the Chocolate: While the balls chill, melt your chocolate chips or candy melts in the microwave or using a double boiler. Stir until smooth.
  7. Coat the Balls: Using a fork or toothpick, dip each ball into the melted chocolate, ensuring it’s fully coated. Place them back on the parchment-lined sheet.
  8. Set and Serve: Let the chocolate harden by leaving the balls at room temperature or refrigerating them. Once set, they’re ready to enjoy!
Peanut Butter Balls

Tips for the Best Peanut Butter Balls

  • Use Room-Temperature Cream Cheese: Softened cream cheese blends more easily and prevents lumps.
  • Add Toppings: Sprinkle crushed nuts, coconut flakes, or sprinkles on top before the chocolate hardens for extra flair.
  • Storage: Store these treats in an airtight container in the fridge for up to a week or freeze for longer shelf life.

Serving Suggestions

These peanut butter balls are incredibly versatile! Pair them with:

  • A cup of hot coffee or tea.
  • A scoop of vanilla ice cream for an indulgent dessert.
  • Decorative boxes or jars as a thoughtful homemade gift.
Peanut Butter Balls

FAQs About Peanut Butter Balls

1. Can I use natural peanut butter?
Yes, but make sure it’s well-stirred and not too oily. Natural peanut butter can sometimes make the mixture too soft.

2. Can I make these dairy-free?
Absolutely! Substitute cream cheese with a dairy-free alternative like vegan cream cheese.

3. What if my mixture is too sticky?
If your dough is too sticky to roll, add more powdered sugar a little at a time until the consistency improves.

4. Can I use white chocolate instead of dark chocolate?
Of course! White chocolate or even milk chocolate works beautifully for coating these treats.

5. How long do they last?
These peanut butter balls can be refrigerated for up to one week or frozen for 2–3 months.

Conclusion

These 4-Ingredient Peanut Butter Balls with Cream Cheese are a dream come true for dessert lovers. Whether you’re hosting a party, craving a sweet treat, or looking for an easy edible gift idea, this recipe is sure to be a hit. Give it a try and enjoy the rich, creamy flavor in every bite! Let us know how your batch turned out in the comments below, and don’t forget to share this recipe with your fellow foodies.

Baked Parmesan Zucchini Fries: A Healthy and Delicious Snack

Are you searching for a guilt-free, mouthwatering snack that’s easy to prepare and bursting with flavor? Look no further than Baked Parmesan Zucchini Fries! These crispy, cheesy, and nutritious fries are the perfect alternative to traditional potato fries. Whether you’re looking for a quick bite, a party appetizer, or a fun way to include more vegetables in your diet, this recipe checks all the boxes.

Why Choose Zucchini Fries?

Zucchini is not only low in calories but also packed with essential nutrients like vitamins A, C, and potassium. These baked zucchini fries offer the satisfying crunch of fried snacks without the extra calories and grease. Pair them with your favorite dipping sauce for a truly irresistible treat.

Baked Parmesan Zucchini Fries

Ingredients:

  • 2 medium zucchinis
  • 1 cup grated Parmesan cheese
  • 1 cup panko breadcrumbs
  • 2 large eggs
  • 1 teaspoon garlic powder
  • 1 teaspoon Italian seasoning
  • ½ teaspoon salt
  • ½ teaspoon black pepper
  • Olive oil spray (optional)

Instructions:

1: Prepare Your Ingredients

  1. Preheat your oven to 425°F (220°C). Line a baking sheet with parchment paper or lightly grease it with olive oil spray.
  2. Wash and dry the zucchinis. Slice them into thin, fry-like strips.

2: Create Your Breading Station

  1. In one shallow bowl, whisk the eggs.
  2. In another bowl, mix the Parmesan cheese, panko breadcrumbs, garlic powder, Italian seasoning, salt, and black pepper.

3: Coat the Zucchini

  1. Dip each zucchini strip into the whisked egg, ensuring it’s fully coated.
  2. Roll the zucchini strip in the Parmesan breadcrumb mixture, pressing lightly to adhere.

4: Bake to Perfection

  1. Arrange the breaded zucchini fries on the prepared baking sheet in a single layer.
  2. Lightly spray with olive oil for extra crispiness (optional).
  3. Bake in the preheated oven for 20–25 minutes, flipping halfway through, until golden brown and crispy.
Baked Parmesan Zucchini Fries

Why These Fries Are a Winner

  1. Healthier Alternative: These fries are baked, not fried, making them a lighter snack option.
  2. Burst of Flavor: Parmesan and seasonings elevate the natural taste of zucchini.
  3. Customizable: Adjust the spices and dipping sauces to suit your taste preferences.

Perfect Pairings

Zucchini fries pair wonderfully with dipping sauces like marinara, ranch, garlic aioli, or spicy Sriracha mayo. Serve them with a fresh salad for a complete, balanced meal or as an appetizer at your next gathering.

Baked Parmesan Zucchini Fries:

Nutritional Information

Each serving of baked Parmesan zucchini fries (about 10 fries) contains approximately:

  • Calories: 150
  • Protein: 7g
  • Carbohydrates: 12g
  • Fat: 8g
  • Fiber: 2g
  • Sugar: 2g

FAQs About Baked Parmesan Zucchini Fries

  1. How to Keep Fried Zucchini from Getting Soggy?
    • To keep fried zucchini crispy, drain excess oil on paper towels and serve immediately. You can also bake it at a high temperature (400°F) for a few minutes to maintain crispiness.
  2. Are Zucchini Fries Better Than Regular Fries?
    • Zucchini fries are a healthier alternative to regular fries, offering fewer calories and more nutrients while still being crispy and flavorful.
  3. How to Reheat Fried Zucchini in the Oven
    • Preheat your oven to 375°F and place the fried zucchini on a baking sheet for 10-12 minutes, flipping halfway through to restore crispness.
  4. What Does Fried Zucchini Taste Like?
    • Fried zucchini has a crispy exterior and a tender, slightly sweet interior, with a mild, savory flavor that complements the seasonings.

Baked Parmesan Zucchini Fries are a testament to the fact that healthy eating doesn’t have to be boring. Try them out and share your experience in the comments! Happy snacking!

Sliced Baked Potatoes Recipe – Perfectly Savory

If you’re looking for a simple yet delicious way to prepare potatoes, look no further than this Sliced Baked Potatoes Recipe! With crispy edges, tender insides, and an irresistible savory flavor, this dish is sure to become a household favorite. Whether you’re serving it as a side dish for dinner or as a tasty snack, these perfectly baked potato slices will elevate your meal to the next level. In this article, we’ll guide you through a step-by-step recipe, provide tips for getting those golden crispy edges, and answer some frequently asked questions to make sure you nail it every time!

Why You’ll Love This Sliced Baked Potatoes Recipe

Baked potatoes are a versatile and healthy comfort food. By slicing them before baking, you ensure that every bite has the perfect balance of crispy skin and tender insides. Not only are they delicious, but they’re also customizable to your taste. Whether you prefer classic garlic and rosemary, cheesy and creamy, or seasoned with your favorite herbs, this recipe can easily be adapted to suit your preferences.

Sliced Baked Potatoes

Ingredients for Sliced Baked Potatoes

  • 4 medium-sized russet potatoes (or Yukon gold potatoes for a creamier texture)
  • 2 tablespoons olive oil (or melted butter for extra richness)
  • 1 teaspoon salt (adjust to taste)
  • ½ teaspoon black pepper
  • 1 teaspoon garlic powder
  • 1 teaspoon paprika (optional for added color and flavor)
  • Fresh herbs (rosemary, thyme, or parsley) for garnish
  • ½ cup grated Parmesan cheese (optional for a cheesy finish)
  • 1 tablespoon fresh lemon juice (optional for added brightness)
Sliced Baked Potatoes

Step-by-Step Guide to Making Sliced Baked Potatoes

1. Preheat the Oven: Start by preheating your oven to 400°F (200°C). This will ensure that the potatoes cook evenly and achieve that perfect crispy texture.

2. Wash and Slice the Potatoes: Wash the potatoes thoroughly to remove any dirt or debris. Pat them dry with a towel. Leave the skin on for extra flavor and texture. Slice the potatoes into ¼-inch thick rounds. Make sure the slices are uniform in size to ensure even cooking.

3. Season the Potatoes: In a large bowl, toss the potato slices with olive oil, salt, pepper, garlic powder, and paprika. If you want to add a richer flavor, melted butter can be used instead of olive oil. Make sure each potato slice is evenly coated with the seasoning mixture.

4. Arrange the Potato Slices: Lay the seasoned potato slices in a single layer on a baking sheet lined with parchment paper. Try to avoid overlapping the slices to allow for maximum crispiness.

5. Bake the Potatoes: Place the baking sheet in the preheated oven and bake for 25 minutes. After 25 minutes, flip the potato slices over to ensure they cook evenly on both sides. Bake for an additional 15-20 minutes or until the potatoes are golden and crispy.

6. Optional Cheese and Herbs: Once the potatoes are done, sprinkle grated Parmesan cheese on top for a savory, cheesy finish. You can also add fresh herbs like rosemary or thyme during the last 5 minutes of baking for extra aroma and flavor.

7. Serve and Enjoy: After baking, remove the potatoes from the oven and sprinkle them with a bit more salt and fresh herbs like parsley or thyme. Serve them immediately as a side dish, snack, or appetizer. Drizzle with lemon juice for a pop of freshness if desired.

Sliced Baked Potatoes

Pro Tips for Perfect Sliced Baked Potatoes

  1. Use the Right Potatoes: Russet potatoes are ideal for baking as they have a high starch content, which helps them become crispy on the outside while remaining soft on the inside. Yukon gold potatoes are great if you prefer a creamier texture.
  2. Don’t Overcrowd the Baking Sheet: To get that golden crispiness, ensure the potato slices are arranged in a single layer without overlapping. If they are too close together, they will steam rather than bake.
  3. Season Well: Be generous with the seasoning! Potatoes can handle a good amount of salt and spices, so don’t be afraid to experiment with different seasonings like rosemary, thyme, or even chili powder for a spicy kick.
  4. Flip Halfway Through: Flipping the potato slices halfway through baking ensures that both sides get crisp and evenly cooked.
Sliced Baked Potatoes

Frequently Asked Questions (FAQs)

1. Can I use other types of potatoes for this recipe?
Yes! While russet potatoes are the best for a crispy exterior, you can use other varieties like Yukon gold potatoes for a creamier texture or even red potatoes for a different flavor.

2. How do I store leftover sliced baked potatoes?
Store any leftover baked potatoes in an airtight container in the refrigerator for up to 3-4 days. To reheat, place them on a baking sheet in a preheated oven at 375°F (190°C) for about 10-15 minutes to bring back the crispiness.

3. Can I make these potatoes ahead of time?
You can prepare the sliced potatoes, season them, and store them in the refrigerator for a few hours before baking. Just make sure to bake them fresh for the best texture and flavor.

4. Can I add cheese to these potatoes?
Absolutely! Adding cheese, such as Parmesan, cheddar, or mozzarella, is a great way to elevate the flavor. Sprinkle it on top during the last few minutes of baking for a melty, golden finish.

5. How can I make these potatoes spicier?
To add some heat, sprinkle chili powder, cayenne pepper, or red pepper flakes along with the garlic powder and paprika for an extra spicy kick.

This sliced baked potatoes recipe is sure to become a staple in your kitchen. Whether you’re making them for a weeknight dinner or serving them at a gathering, they’re always a hit!